Waterproof Duct Tape Pool {or Beach} Bag Tutorial
If you're a woman, you love a new bag! Sorry to be cliche, but isn't it true? I can't walk through Kohl's without checking out their purses, wallets and handbags! My heart does a little pitter-patter when I spot one I love.
I've got a cute and easy tutorial for a bag that won't hurt your wallet...waterproof Duct Tape pool bags!
Affiliate links are included for your convenience. My full disclosure policy is available here.
So technically, duct tape isn't waterproof...in other words, if you leave it in a tub of water it's going to break down. But it's definitely water-resistant, easy to wipe off if it gets wet and perfect for holding wet swimsuits and towels!
Of course picking out a cute Duct Tape pattern to use is half the fun...I fell in love with this quilt patchwork pattern as soon as I saw it; I love everything about it!
SUPPLIES TO MAKE A DUCT TAPE BEACH BAG
- 2 rolls of Duct Tape in alternating patterns
- white plastic kitchen trash bag
- Sharpie
- scissors
- masking tape
HOW TO MAKE A DUCT TAPE BEACH BAG
Let's get started...
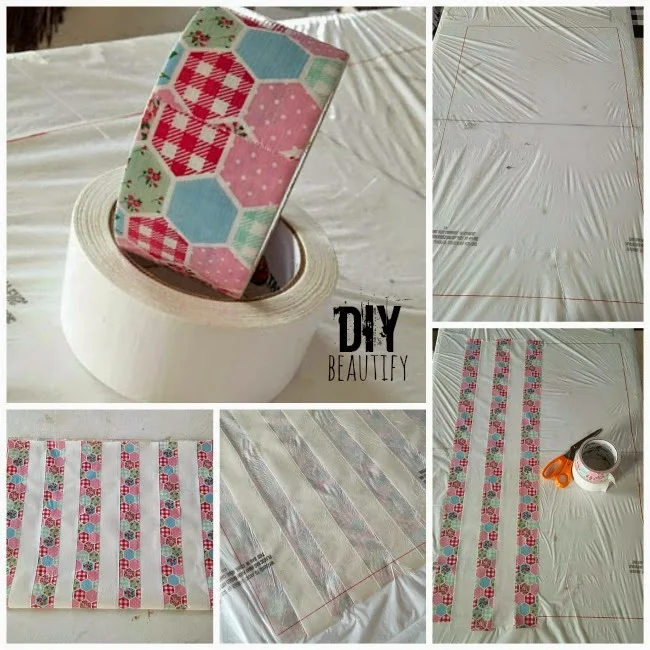
Cut open the plastic bag along one edge and the bottom and tightly tape it to a table top; use Sharpie to mark out a 16 x 30" rectangle (to get the size of bag I made).
Next you start taping right on top of the bag, alternating your tape and slightly overlapping each layer until you cover the entire rectangle. Make sure to overlap the edges you drew just a little bit too.
Once you're done, press it all down well and then release your bag from the table. Flip it over and cut out along the Sharpie lines so you have a nice big rectangle of Duct Tape.
Here are a few pictures of this process:
The next step is to tape over your top and bottom edges (separately, not together). Now fold up your bag and tape the sides together.
Now it's time to attach the handles. On the video she did made one handle, but it made for awkward carrying..and it was hard to get stuff into and out of the bag. So I took my handle off and made two instead. MUCH better.
Here's how to make your handles:
And that is it my friends. In about 30-40 minutes you just created a cute, waterproof bag! Perfect for the pool, beach, even grocery shopping!!
You know me...I didn't stop at one!
I made one for Little DIY too...
I love the bright colors and chevron pattern she picked out so much! It is so 'her'! Her handles are slightly shorter (about 22") and I did her bag just a little bit differently, can you tell? I laid the stripes the opposite way so they'd be horizontal. She has already taken it to the pool and all her friends want one too!
I am so glad I know how to make these now. I think they would be great birthday gifts, filled with lots of goodies and taken to a party. What (big or little) wouldn't want to get one of these?
I hope you'll try this easy duct tape pool bag tutorial for yourself! Summer's just official starting so you're sure to get lots of use out of it.
Looking for a tutorial for duct tape wallets? Here's one and here's a step-by-step tutorial.
Become a DIY insider!
You'll never miss a post, and you'll get all my FREE tutorials
and more...delivered straight to your inbox!
and more...delivered straight to your inbox!
Let's be Social! Follow along on Pinterest, FB, Twitter, Instagram
This blog's content is for entertainment purposes only and is not professional advice. By reading this blog and attempting to recreate any content shared on it, you assume all responsibility for any injuries or damages incurred. Read my full disclaimer here.


