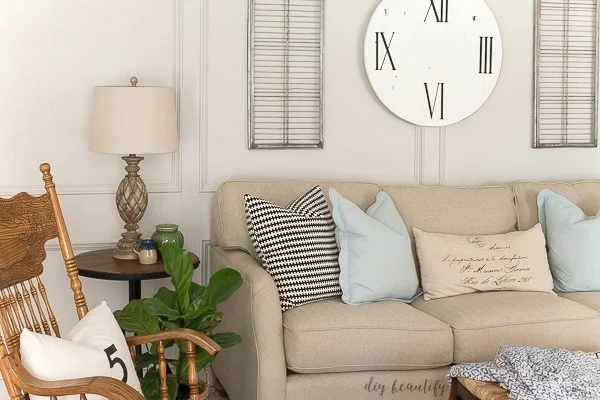
How to Make a Faux Farmhouse Clock
An easy tutorial to make a farmhouse clock using the bottom shelf of the IKEA VITTSJÖ table or any round piece of wood
This post may contain affiliate links for your convenience. View my full
advertising disclosure
here.
Do you love IKEA? The prices are the best thing and not
only are the pieces affordable, but they can be remade with a little
ingenuity and creativity to suit any decor style!
That is the story with this coffee table (the IKEA VITTSJÖ) that I turned
into a farmhouse clock. The coffee table is still completely functional
because there is a glass piece as well.
Here's a picture of the
coffee table without the dark shelf piece (that I snagged to make the
farmhouse clock). I actually like how airy and open it looks now, so it was
a win-win on all fronts 🌝
When we recently had our dungeon-ous
paneled living room painted and lightened up
, we took the opportunity to add some furniture and move pieces around.
We were left with the IKEA VITTSJÖ coffee table. This little $40 table had
already undergone somewhat of a hack when we purchased it and I spray
painted the legs with Rustoleum's
Champagne Mist, a soft
gold tone, to cover up the black.
However, I always knew that the bottom shelf piece would make a great
farmhouse clock, and now seemed the perfect time to make it...I needed some
lightweight artwork to hang above our new sofa!
How to make a farmhouse clock
This was an easy project and completed in a day! Of course you don't need to start with the IKEA VITTSJÖ! Any large round piece of wood will do! Or make a square clock!
Supplies
- DecoArt Americana Decor Chalky Finish Paint in Everlasting
- favorite 2-1/2" angled Purdy CUB brush
- craft vinyl
- Silhouette die-cut machine
- black acrylic paint
- large stencil brush
- round shelf piece from IKEA VITTSJÖ coffee table
Tools
- Dremel multi-purpose toolkit
- straight edge ruler
- Ryobi finishing sander
Here's how I made this farmhouse clock using the round shelf from the IKEA VITTSJÖ coffee table.
Step 1: Paint
The first step was paint. I used Everlasting, a creamy white from DecoArt's Americana Decor Chalky Finish line. It's the perfect white for farmhouse projects; it adds a pop of brightness without being too sterile! Three thick coats did it.Step 2: Create faux lines
I wanted to mimic the look of pallet wood, without actually having to cut into the particleboard! The answer was the Dremel. It's a rotary carving tool that we like to use for removing paint or rust from metal. I know there are many other uses. After measuring and marking every 5 inches, I used a pointed tip from the Dremel and ran it along a straight edge to create lines that give the piece the look of pallet wood!Step 3: Sand
Next I sanded the painted piece really well, going for a very distressed look.Step 4: Stencil the clock face
The last step was painting the roman numeral using a stencil I created with my Silhouette machine. I was able to be very precise about the length and width of my numbers because I created them right in the software and then cut them out. Black acrylic paint and a pouncing motion with a stencil brush took just a few minutes.
Tip: to make this a functioning clock is easy; simply cut a hole in the
center and insert
large clock hands. We chose to keep it purely decorative.
The clock, along with two antique bakers racks I recently found at a flea
market, were the perfect additions to this painted paneled wall.
Isn't this an awesome IKEA hack?
I love the distressed farmhouse look, and I love that it cost me nothing!
Pin it to remember!
bringing beauty to the ordinary,


Comments
Post a Comment
Your comments are like sunshine and chocolate! Thanks for taking the time to leave a nice one ;) I read all comments and love to respond. If you don't have Gmail, please leave your name!