How to Make Thrifty Antiqued Pumpkins
Read on to find out how easy it is to transform those gaudy Dollar Store foam pumpkins into beautiful antiqued pumpkins!
Affiliate links may be included for your convenience; my full disclosure policy can be found here. If you click through and make a purchase I'll receive a small commission at no extra cost to you!
Fall will be here soon, and that means pumpkins! Some of you have been asking for thrifty fall projects, and today's antique pumpkins are fun to make and so cheap you might want to make a bushel-full!
I'm trying something different today...showing you the ugly before picture first! Is it working? Are you intrigued enough to continue reading? I hope so because this project rocks!
This pumpkin project ticks all the right boxes for me:
✔ it's cheap
✔ it's easy
✔ it looks amazing
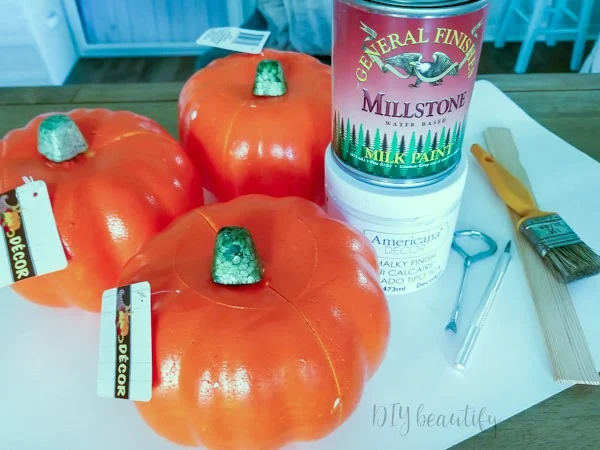
Seriously, look at those garish orange pumpkins! I think they're actually getting brighter each year, lol!
Do they look real? Umm...NO!
Are they remotely attractive? NO! (at least in my opinion)
Can we make something beautiful out of them? YES WE CAN!
Do they look real? Umm...NO!
Are they remotely attractive? NO! (at least in my opinion)
Can we make something beautiful out of them? YES WE CAN!
We can make stunning, antiqued pumpkins that will be the stars of your fall decorating!
Don't believe me?
Check this out...
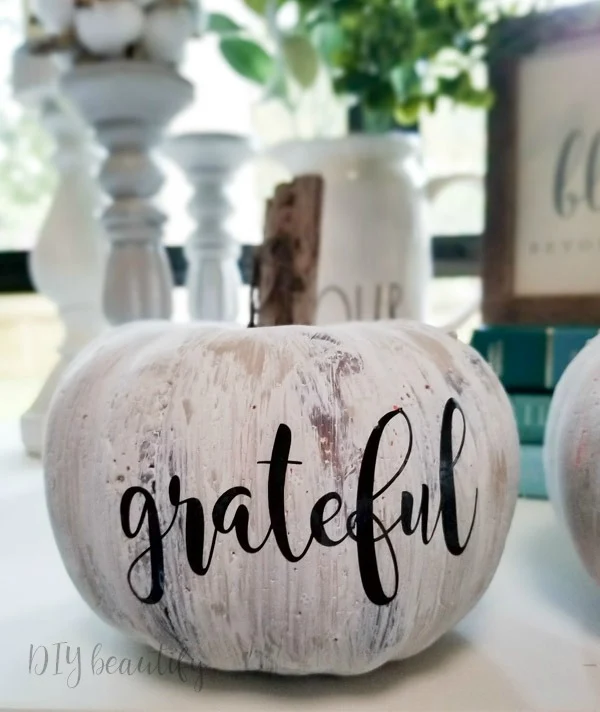
Whuuuut? How awesome is that? Now if you don't want to put words on your pumpkins, you certainly don't have to. I had a plan in mind for these pumpkins (which I'll be sharing in an upcoming post soon) and that's why I chose to do so.
Update: Check out my fall tablescape decorated with these thrifty antiqued pumpkins
Update: Check out my fall tablescape decorated with these thrifty antiqued pumpkins
Today I want to share how to turn neon orange pumpkins into things of beauty!
Supplies for thrifty antiqued pumpkins
- 4.5" foam pumpkins from DollarTree (however many you want to make; if your store doesn't have them yet, you can order them online here!)
- light gray or beige paint...it really doesn't matter that much. I used this one that I've had in my stash forever!...finally found a use for it! It doesn't have to be chalk or milk paint, it can be leftover house paint as long as it's flat or satin finish!
- dark brown acrylic paint (not pictured) but I used this one
- DecoArt Vintage Effect Wash paint in white*
- wood skewers
- chip brush or foam brush (just cheap brushes that you can toss when you're done)
- tall jars or glasses
- 1/2" width sticks from your backyard
* Hey friends, the supplies list is to show you what I used. I realize that if you go out and purchase everything I list, this probably won't be a thrifty project for you! And I don't want you to do that! Some of these items will make sense to purchase in bulk because you'll use them often. Other items you can make do with what you have if you have a decent stash of paints!
How to antique dollar store pumpkins
Remove all the pumpkin stems first. They're very easy to pull out.
Start by painting the pumpkins with a coat of the beige (or gray) paint. Stick the skewer into the bottom of a pumpkin to make painting the whole thing at one time much easier. Once you're done painting, just pop them into a jar to dry.
Once dry, you will notice that not all of the paint stuck. These pumpkins have a weird shiny finish which will cause some of the paint to bubble. Don't worry about that because we are painting multiple coats and it will all be covered in the end! Brush some burnt umber (brown) paint onto those spots, as well as in some of the grooves between segments. Again put in jars to dry. Sorry I don't have a still shot of this step....too many things to hold!
Now it's time to antique these pumpkins. I love the Vintage Effects paint for this, but if you don't have it you can water down some white chalk paint. Brush on, covering the majority of the pumpkin. Use a damp paper towel to wipe some back, revealing some of the brown paint. I have a great post on whitewashing pumpkins that you can read here if you choose to go that route.
The pumpkin in front just has a coat of beige on. The ones in the back have been painted with the burnt umber as well as the whitewash. See what a difference it makes! 😮😮😃
The last step is to poke your stick in to substitute as a stem. I had my glue gun all ready to go, but realized I didn't even need it because the foam held the stick enough.
What do you think of my antiqued pumpkins? You could make a bushel of these and fill up a basket for very little money!
Each one is slightly different in color...which is how they are in nature!
If you want to add words, you can do what I did and apply craft vinyl cut out with a Silhouette machine, or you could hand paint them, or even use stickers.
Update: You can check out my fall dining tablescape right here
Congratulations to the winners of my 5 Days of Giveaways! Please check your inbox for an important email from me!
Day 1 - Cheryl Stewart
Day 2 - Cheryl Anthony
Day 3 - Melissa S.
Day 4 - Audrey Stewart
Day 5 - Sharon Rissler
bringing beauty to the ordinary,


Your pumpkins turned out Great; especially like the wording on them. They would look great centered on dining room table for Fall / Thanksgiving.
ReplyDeleteOn the 5 day giveaway; Congratulations to all the lucky winners.
ColleenB.~Tx.
Thanks Colleen, that's very sweet of you! Let me know if you make some pumpkins!
DeleteSo cute! Love the words too! What font did you use?
ReplyDeleteThanks Mary! I think it was called Magnolia.
DeleteYour pumpkins are perfect for fall decor and I love that they were a thrifty makeover project.
ReplyDeleteSuper cute! I love Dollar Tree crafts and especially pumpkin makeovers!
ReplyDeleteThanks Amber, saving money on seasonal decor is a smart way to decorate! And I love pumpkins too 😉
Delete