Grandfather Clock Makeover
Today I'm sharing a thrift store grandfather clock and how to give it a beautiful makeover with chalk paint!
Affiliate links may be included for your convenience;
my full disclosure policy c
an be found here. If you click through and make a purchase I'll receive a small commission at no extra cost to you!
I really lucked out in the husband department...in more ways than one! 💙
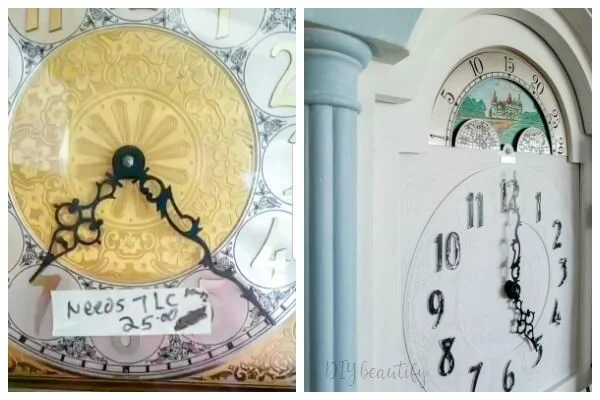
My guy likes to shop! On one of our little anniversary getaways, we stopped in at a thrift store and Mr DIY spotted this grandfather clock. It was in serious need of TLC, but
just look at that price!
I actually had to be convinced to buy it. I'm a realist and was thinking:
1. That looks like a LOT of work!
2. Where on earth will we put it?
Obviously I was talked into it, and now that it's been made over, I'm so glad that we purchased it!
If you follow me on
Instagram, I shared this makeover in my stories. As is usually the case, when Mr DIY goes away on a trip, I take on a big project. I don't know why I do this to myself because I have no one but myself to rely on and make decisions...
and move all the heavy stuff!
I don't know, maybe I enjoy the challenge? Maybe I'm trying to prove something to myself? Do you do this too?
This large clock had been sitting in our front room (hidden in a corner) for over a year!
The weekend Mr DIY was away, I dragged it out into our
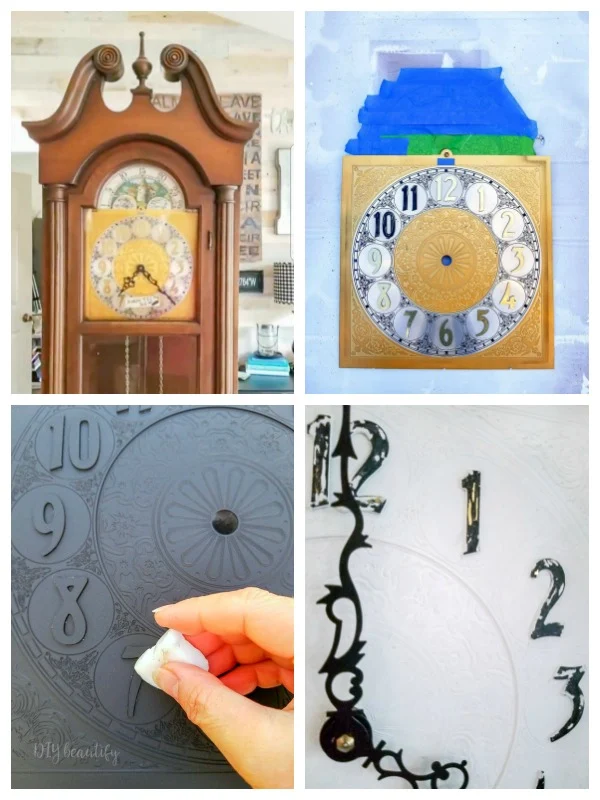
sun room where there's lots of light so I could get a good look at it and see just what was going to be required for this makeover...I apologize for the blurry before photo...I had to grab it off my stories...apparently I was so excited to get started that I didn't take an actual picture!
The clock was made by Colonial in the early 70's. I found a replica online, and this is how beautiful it can look when it's fully restored. Notice the price!!

|
| Photo Courtesy of Chairish.com |
Did I mention we paid $25 for our clock?
Here are a few close up pictures of the state of my clock. Eewww, right? TLC needed indeed!
My goal with this clock was not to restore it to original condition, and not even to fix it so it could work again. The gong was missing, as well as a couple of the pipes.
I didn't have the knowledge to mess with that, and honestly, no one in my family appreciates a clock that chimes on the hour anyway!
My goal was simply to clean it up and make it look pretty!
How to Paint a Grandfather Clock
Clean Before Paint
The biggest issue was dust and grime! This baby was dirty! So the first order of business was to clean it! I used my vacuum, as well as my favorite
degreaser to make a good start. I did find a few interesting items in the bottom amidst all the dust, including the original warranty from 1973, and an extra bottle of conditioning oil in the original box with postage of $.10!!!
I also found the side 'windows' that we thought were missing! They're actually panels of wood that slide in and out of their slots! This saved me a lot of time and money because I thought I was going to have to have glass cut to fit those spots!
Remove Door
To make this makeover as easy as possible, I chose to remove the door from the clock. I also knew that this makeover wasn't going to be completed in a day! I gave myself the week to work on it, which made it more manageable than having unrealistic expectations!
Chalk Paint
Once the clock was as clean as I could get it, it was time to give this eyesore its makeover! I painted it with
my favorite white chalk paint and
Purdy brush. There were a lot of places that needed paint, sp rather than getting overwhelmed, I focused on the outside of the clock first! Three coats of white and already it was looking like a different piece!
I was able to unscrew the corbel from the top and paint it by holding onto the screw and just turning it in my hands. Much easier than painting it while it was still attached to the clock!
Add an Accent Color
I wanted to emphasize the columns on the front of the clock, and was able to easily do this with one coat of paint (I used
this color) and a small,
flat craft brush. This brush made it easy to paint the edges without having to tape anything off.
Paint Inside
Once the outside was finished, I painted the inside...a little more difficult as I had to paint around the clock works. But I took it slow, did a lot of squats 😏 and breathed a sigh of relief when it was finished!
Tackle the Face Plate
The whole time I was working on the outside and the inside of the clock, I was thinking about the actual face of the clock. I'll spare you my ruminations! But suffice it to say that I thought LONG and HARD about how I wanted it to look, and how I was going to achieve that look!I'll break them down in more detail below.
Once the side panels were painted and put back into place, the door was reattached, and a new key purchased (I found an inexpensive replica on Ebay) to keep the door closed, I could finally say "It's done!"
- after removing the face plate from the door (it was held on with screws), I taped off the decorative piece at the top as well as the manufacturer name, and tried to paint the numbers with black paint, but it was slow going and streaky
- then I moved in another direction, and instead I spray painted the entire plate black
- once dry, I rubbed a piece of wax on the numbers only
- then I spray painted over everything with white paint
- last, I used my nail to scrape off most of the white from the numbers, revealing the black that was underneath, giving it a bit of a chippy look
This technique is one I share in more detail in
this post. The wax preserves the bottom layer (the black), which can be easily revealed even after a layer of paint is added above it. If you have any questions, please ask in the comments! I like how the black letters match the clock hands, and pop on the white background!
Once the side panels were painted and put back into place, the door was reattached, and a new key purchased (I found an inexpensive replica on Ebay) to keep the door closed, I could finally say "It's done!"
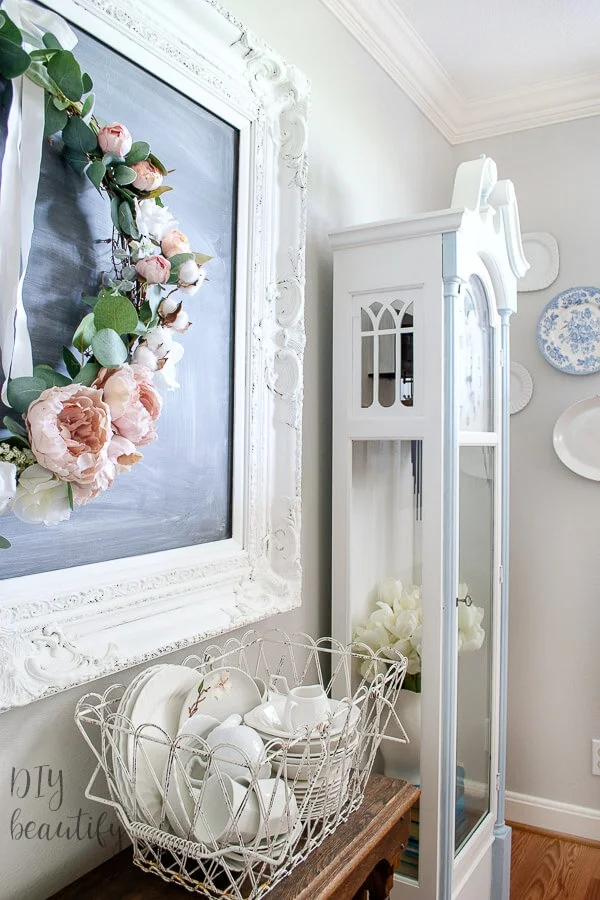
"She" is currently residing in our dining room. I have filled her with books and plants. You can see how she's already changed her look a few times in here!
Here's a better view of those side panels. I think the original clock had some sort of plexiglass to disguise the inner workings, but I like it how it is!
Here's a closer look at her beautiful face.
She is perfectly shabby and stylish and fits right in with our home's decor! And she is forever set to 5:00! 😉
Pin this image
What do you think of my painted grandfather clock makeover?


What a beautiful clock makeover! Goodness you got a good deal on it too! Love the entire transformation!
ReplyDeleteThanks so much Christine!
DeleteI have been wanting to makeover my own grandfather clock. You have inspired me to finally just do it! Thanks so much, Cindy.
ReplyDeleteYay, have fun Meegan!
DeleteThis looks fabulous! I can't believe it is the same clock! Great job! I love the shabby chic look.
ReplyDeleteShe's come a long way, lol! Thanks so much!
DeleteShe's gorgeous! Amazing transformation! Thanks for the inspiration and sharing.
ReplyDeleteThank you Debra!
DeleteOh, Cindy! This is absolutely gorgeous and what a great price you paid for this piece! After seeing this, I'm going to keep an eye out for an old grandfather clock to redo! Thanks for sharing your inspiration!
ReplyDeleteThanks so much Michelle!
DeleteIt looks stunning and yes you are right, it looks perfect in your home. Great recycle project.
ReplyDeleteThanks so much Marianne!
DeleteYou gave it such a refreshing new Makeover!
ReplyDeleteThank you!
DeleteI'm blaming you when I force my husband to help me drag home an old grandfather clock as soon as I can find a cheap one! LOL! This is absolutely stunning ... would have never thought of painting them. That old oak is a bit meh. The white is so much better.
ReplyDeleteHahaha, it's a great way for them to show us their muscles ;) Thanks so much Danielle, good luck finding one!
DeleteOmg Cindy, this is GORGEOUS! You did an amazing job!! So funny that your hubs loves to shop and found it :) I love how you decorated it too :) I'm going to be on the hunt for one of these now. P.S. Those are the exact same two things that I say to myself too when I'm thrifting lol
ReplyDeleteAww, thanks so much Eileen!! I wish you luck with your search 😊
DeleteThis is beautiful and it is a perfect addition to that room! Love it!
ReplyDeleteThank you!
DeleteThis turned out so GORGEOUS! I always pass by clocks because they look like a pain in the rear but if the outcome is half as good as yours it would totally be worth it! Pinned!
ReplyDeleteThanks Betsy, it totally was a pain in the rear 😁 but i'm still glad I did it!!
DeleteBeautiful reno on a classic piece. I recently purchased a neglected clock for $35. I plan on removing the clock works and putting mirror glass on the door. The small upper side panels on mine have speaker cloth to block the mechanical parts but will let sound through.
ReplyDeleteBeautifully done! Did you put anything over the chalk paint like a wax or just chalk painted it? Thank you!
ReplyDeleteThank you! I didn't bother with a top coat as it's not a piece that gets touched much.
DeleteHi! I just bought a clock very similar to this one today for $20. The clock doesn't work and the pendulum is missing, but I wanted it primarily as a decor piece. I also plan to paint mine white with chalk paint, but my question is, did you do any sanding at all, and do you recommend priming the clock first?
ReplyDeleteI didn't do any sanding. I painted with chalk paint, so sanding isn't required. For that reason I also didn't prime! I have several posts on chalk paint if you're interested in learning more, just search "chalk paint" in the search bar.
DeleteI love everything about the makeover!!! The price was crazy good! We have an old Grandfather clock that we inherited from my husband's Mother. The only problem with it is that it doesn't work! Ugh. I believe my MIL had a professional work on it and they couldn't fix it. I am learning towards painting it, especially after seeing how gorgeous yours turned out. Thank you for sharing!
ReplyDeleteThanks so much! I've filled it with stacks of vintage books in the past, want to try adding some folded quilts!
Delete