How to Make Spindle Candlesticks from an Old Chair
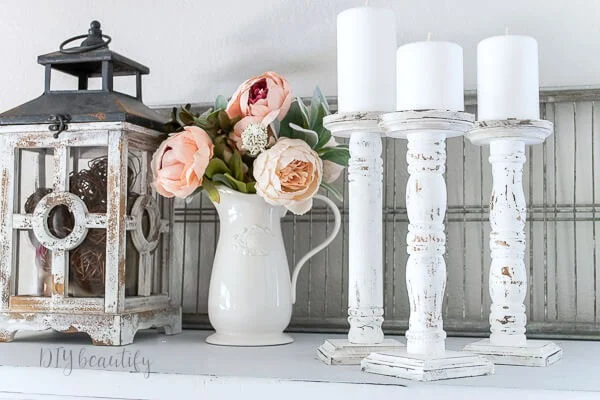
Create chippy candlesticks from the turned spindles of an old chair! This is an easy project even for power tool newbies!
Updated 12-22
Affiliate links may be included for your convenience;
my full disclosure policy can be found here. If you click through and make a purchase I'll receive a small
commission at no extra cost to you!
I love coming up with creative ways to decorate my home that cost very little
(like free!) If you enjoy thrifty home decor ideas, I think you're going to
love this project. I turned an old, beat up chair into a set of chippy spindle
candlesticks! Keep reading to see how I made them and ideas for decorating for them all year long, including Christmas!
If you're handy with power tools, you're going to be able to whip these DIY
candlesticks out in no time! However, for the power tool newbie (that's me
✋✋...and it may be you too), this is about a 2 hour project from start to
finish.
Mr DIY is power tool savvy and he usually handles any cutting and drilling,
etc that I need done. However, as he was out of town while I was working on
these DIY candlesticks, I was on my own. Thankfully he was only a phone call
away, as I did need some help!
HOW TO RECYCLE AN OLD CHAIR
Let's talk candlesticks for just a sec. We all have them, and they usually
cost a pretty penny, especially if they're made of wood! Not these adorable
farmhouse chippy ones I made! These ones were super duper cheap! I used
the spindles from a discarded chair that had a busted seat. The
Dremel Saw Max pictured below made it easy to completely dismantle the chair in just a
few minutes! It was like cutting through butter! Look at all those beautiful
spindles I cut off this one chair!
I see chairs like this at the curb all the time! Look for ones with turned
legs or a little bit of curve as they make the most pleasing
candlesticks.
I gave these spindles a chippy paint finish
(find that tutorial HERE)
and decided to turn the larger ones (from the chair legs) into candlesticks.
Keep reading to find out exactly how to make your own wood candle holders from
furniture pieces.
Supplies
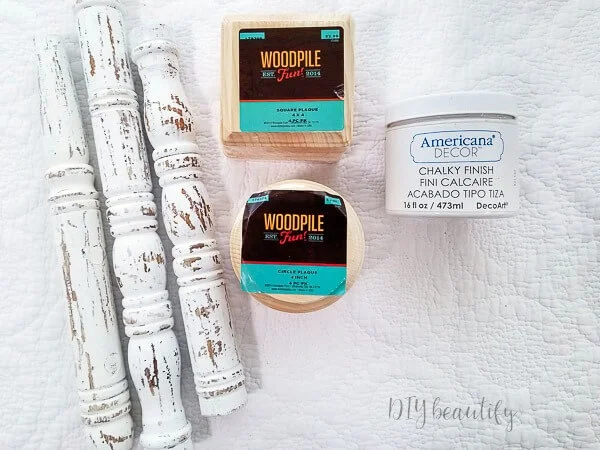
- you'll need 3 chair or even porch spindles
- small 4" square and circle plaques, 3 of each (I found these at Hobby Lobby)
- white chalk paint
- stain (I used this exact one)
- paint brush (this one is my all time fave!)
- sandpaper (some of the plaques needed a little sanding to smooth the edges)
- screws
Tools Needed
- chop saw (optional)
- drill
- small drill bit (one of the smallest in a set)
- countersink drill bit
How to Turn Chair Spindles into Candlesticks
Step One - Cut Spindles to Size
Whether you follow my tutorial above to chippy your spindles before creating
the candlesticks or after, it doesn't really matter. Mine were already
chippified here. I found that a couple of my spindles were too tall, so I
needed to chop them down.
Enter the scary chop saw. I'm kidding, I love this tool! Seriously, if I can do this YOU CAN TOO! Hold it steady, and please use
protective eyewear anytime you work with power tools of any kind!!
Step Two - Mark centers
Mark center of each wood square and round and drill a hole using the
countersink bit. This bit creates a larger hole so the screw can sit inside
the hole...otherwise, it would make the candlesticks rather wobbly! Do this
with all 3 tops and bases.
Option - you could use wood glue if you don't want to attach the pieces
with screws; however, then you will need to wait for the glue to dry
overnight before you can decorate with them!
Step Three - Pre-drill holes
Mark the center and pre-drill a small hole (smaller than your screw) into the
spindle ends, top and bottom.
Step Four - Attach candlestick pieces together
Screw the bases and tops into the pre-drilled holes.
I put the tops on upside down, so the beveled edges were on the bottom. I
think it looks better this way!
Step Five - Stain edges
Stain edges of unfinished wood tops and bases. We need to try to match the
bottoms and tops with the spindles, so choose a stain that closely resembles
your chair.
Step Six - Wax and paint bases
Once the stain has fully dried, apply wax to edges and paint bases and tops
with white chalk paint. The wax is necessary for achieving a chippy finish
(refer to THIS TUTORIAL for complete instructions).
Step Seven - Scrape off paint to chippy
Scrape off some of the paint to reveal the dark stain underneath.
That's it! Display your spindle candlesticks wherever you choose!
I know some of you will be keeping your eyes peeled for curbside chairs now!
Three gorgeous candlesticks for well under $10?! YES PLEASE!
I definitely plan to make more of these beauties!
These DIY spindle candlesticks can work with any decor and any season! Here
they are in a Christmas vignette. I used a jar candle on top, but you could
also display them with wax pillar candles like I did above. Lots of options
and wouldn't these make great gifts?
I would love to know if you're inspired to make some spindle candlesticks for
your home! Drop me a comment below.
Pin to Save
Pinning and sharing helps to support my site, thank you in advance!


Love the spindle candlesticks!! Such a fabulous idea to upcycle old spindles!!
ReplyDeleteThanks so much Christine!
DeleteWhat a fun way to create something fresh from a discarded piece of furniture. I love how simple the tutorial is, too. I love me some chippy goodness, that's for sure!
ReplyDeleteThank you Meegan!
DeleteLove them candle sticks and what an easy project. They would make for great gifts as well.
ReplyDeleteThank you
Thank you Colleen, yes, great gifts!!
DeleteLove this! Thanks mucho :}! Looks amazinggg!
ReplyDeleteThanks Sandra!
DeleteSuch a great use for old spindles!
ReplyDeleteThank you!
DeleteThese are stunning! I love everything about them! :)
ReplyDeleteThanks Carmen!
DeleteThose are beautiful and I love that you used spindles from an old chair. Clever idea! I need to remember this idea!!!
ReplyDeleteThanks Stephanie!
DeleteI love how you used an old chair to make these! So creative! And go you for doing it all on your own!! :) :)
ReplyDeleteThank you!
DeleteWhat a great repurpose idea and a great way to make custom gifts for friends.
ReplyDeleteThanks Tonithey would make great gifts for very little money!
DeleteThese are absolutely gorgeous!! Such a creative way to repurpose old chair legs. Love this.
ReplyDeleteThank you so much Christine!
DeleteOh my goodness! I love these candlesticks. The fact that they are repurposed from chair spindles is genius! This project is next on my list!
ReplyDeleteThanks Maureen, that is so sweet of you! They are a fun project!
Delete