Is Black the new Orange?
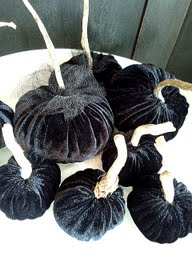
I think it's official. Orange is out. Black is in! Even better when it's soft black velvet pumpkins, topped with real stems!
I've seen these around blog land for several years now and have been just waiting for the right time to try my hand at some. I found a great tutorial over at The Lemonista Velvet Pumpkin Tutorial. She figured it all out and it was easy! If you can push a needle in and out of fabric, you can handle this too. Check out these cuties I made!

My only problem was that I didn't have any real pumpkin stems. It's only August here after all...pumpkins aren't even in stores yet! What's a girl to do?
I went out to our garden and looked at our zucchini plants. Hmmm. Some of the stems were starting to dry out, and they do bear a similarity to pumpkin stems. I cut them long because I really wanted that free form, curly look, laid them on my pizza stone in my oven at 170 degrees, and let them dry out for several hours. Some of the skinnier ones did not take as long. The fatter ones took about 4 hours. I am very pleased with the results. A simple dot of hot glue on the stem, pressed onto the top of the pumpkin and they are done. The mini pumpkins each got a driftwood stem, pieces that I picked up this summer when we were at Arlington Beach in Saskatchewan.
Are you wondering where I bought the black velvet come from? RUN, do not walk, to your nearest Goodwill, and find an article of clothing made from velvet or velour. Why? Because it's cheap, that's why! I made all these pumpkins from a floor-length girls dress and I've only made it through about half of the dress. The whopping total? $3.49. I know, amazing!
The rest of the budget craft rang up at three bags of black eyed peas ($3.25) and a bag of fiber fill ($3.50) at Walmart. So I'm just over $10 for the whole craft. I already had the tulle that I used around the base of some of the stems.
That's a whole lotta pumpkin goodness for very little.
I'm really liking them piled up on my cake stand. I'm thinking as a spooky table centerpiece or even using them as name markers for a Halloween dinner. A little black chalkboard tag with a name would fit quite nicely at the base of the stem.
What do you think? Are you inspired to make some? I'd love to see the results if you do :)
Happy crafting,

Linking up to
The Happy Housie - Work it Wednesday
DIY Sunday Showcase
Primp Your Pumpkin
Throwback Thursday
I've seen these around blog land for several years now and have been just waiting for the right time to try my hand at some. I found a great tutorial over at The Lemonista Velvet Pumpkin Tutorial. She figured it all out and it was easy! If you can push a needle in and out of fabric, you can handle this too. Check out these cuties I made!

My only problem was that I didn't have any real pumpkin stems. It's only August here after all...pumpkins aren't even in stores yet! What's a girl to do?
I went out to our garden and looked at our zucchini plants. Hmmm. Some of the stems were starting to dry out, and they do bear a similarity to pumpkin stems. I cut them long because I really wanted that free form, curly look, laid them on my pizza stone in my oven at 170 degrees, and let them dry out for several hours. Some of the skinnier ones did not take as long. The fatter ones took about 4 hours. I am very pleased with the results. A simple dot of hot glue on the stem, pressed onto the top of the pumpkin and they are done. The mini pumpkins each got a driftwood stem, pieces that I picked up this summer when we were at Arlington Beach in Saskatchewan.
Are you wondering where I bought the black velvet come from? RUN, do not walk, to your nearest Goodwill, and find an article of clothing made from velvet or velour. Why? Because it's cheap, that's why! I made all these pumpkins from a floor-length girls dress and I've only made it through about half of the dress. The whopping total? $3.49. I know, amazing!
The rest of the budget craft rang up at three bags of black eyed peas ($3.25) and a bag of fiber fill ($3.50) at Walmart. So I'm just over $10 for the whole craft. I already had the tulle that I used around the base of some of the stems.
That's a whole lotta pumpkin goodness for very little.
I'm really liking them piled up on my cake stand. I'm thinking as a spooky table centerpiece or even using them as name markers for a Halloween dinner. A little black chalkboard tag with a name would fit quite nicely at the base of the stem.
What do you think? Are you inspired to make some? I'd love to see the results if you do :)
Happy crafting,
Linking up to
The Happy Housie - Work it Wednesday
DIY Sunday Showcase
Primp Your Pumpkin
Throwback Thursday

How fun and spooky in black! I often wonder how many people shop for clothes at Goodwill and then take them home to deconstruct them - very thrifty!
ReplyDeleteSharon, Goodwill is one of my sources for cheap fabric when I craft! You would be amazed at the really nice stuff you can find at rock-bottom prices!
DeleteLove everything about this! Especially, that you got the fabric from something else at Goodwill! I found you via the link party at The Blissful Bee. I will attempt making these soon!
ReplyDeleteBest,
Krista
www.goodwillglam.com
Thanks Krista, they are SO soft and cute in person! I hope you make some, let me know if you run into a snag and I'll be happy to help :)
Deleteooooh black velvet. Awesome!
ReplyDeleteThey are really soft! I made a wreath with the leftovers...sharing that soon :)
DeleteSuper cute. Super tips. Super smart (the zucchini idea)
ReplyDeleteThanks for sharing at PYP!
Thank you Shannon :)
DeleteThey may not be real pumpkin stems but they are super cute. Thanks for sharing at Throwback Thursday.
ReplyDeletexoxo
Denyse
Haha, yes I was really desperate for something that looked like the real thing and this was as close as I could come :)
Delete