Nightstand and a DIY Lamp Makeover {for a girl's room}
My daughter (affectionately known as Little DIY on this blog) is more like me than even I realize sometimes! She's definitely caught the 'diy' bug!
Case in point: we had stopped at Lowe's recently for some supplies and while momma was busy shopping, so was Little DIY. She was busy checking out the 'Oops' paint section and found a gallon of coral paint for $10 that she begged me to buy so we could redo something in her room.
Hmmm, like mother like daughter, right?
{total aside: I am PROUD of the little bargain-huntin, diy-ing monster I've created, lol!}
I hadn't used the coral paint for anything yet because painting her room again (I just painted it within the last year) just wasn't in the cards for me! Painting her nightstand however was a totally do-able project.
Here is the before picture of her nightstand, upper knobs already removed...not bad, but ready for a change!
(this post contains affiliate links (*); click here for full disclosure policy)
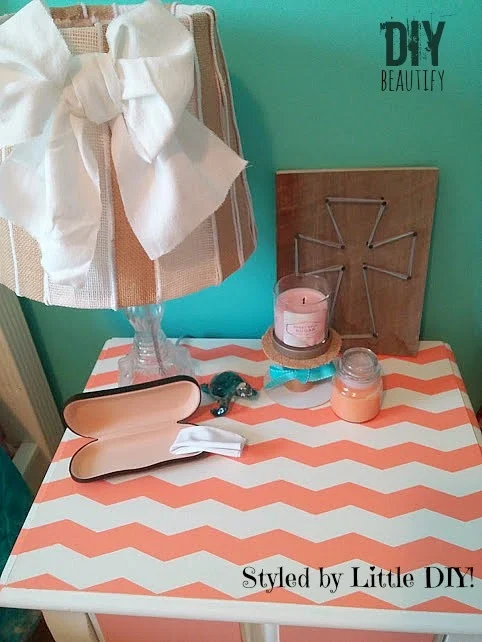
I put Little DIY to work on this one with me, from the design to the actual painting. She's getting big enough to help after all. She is a 'chevron-junkie' so we used the shape tape* by Frog Tape in the chevron pattern to give her nightstand a completely new look.
She made it through the first coat of the top and then begged off the rest...hey, I'm all about baby steps!
So mamma took over and breezed through the rest. I did the chevron stripes on both sides of the nightstand as well, running horizontally. I also painted over the panels that were green and blue with the coral paint. The top got a coat of clear wax* for protection.
Here is the after...Voila
And then Little DIY chose to style it herself...(love the open - and empty - glasses case!)
While we were at it, we tackled a few other little projects in her room. The lamp got a simple makeover with burlap ribbon* strips and a big bow made from a strip of white cotton torn from an old bed sheet. This makeover is similar to the update I recently gave one of my lampshades, covering it with burlap strips. I love how we've modernized it but kept it looking sweet and shabby!
I used some of the leftover coral paint to update a frame and bring some of that color to the other side of her room where the walls are violet...
Little DIY drew the picture that's inside the frame.
We moved a few pieces of furniture around, vacuumed, gently encouraged Little DIY to clean and organize (love when that happens!)
She is ecstatic about her 'new' room and says it feels SO MUCH BIGGER!
Well, it's amazing what happens when you clean a room properly, lol! Here's hoping it stays like this for at least a month!
Remember where we started...and how far we've come?
Hopefully I've inspired you to take on some DIY projects with your son or daughter...it's always more fun when you do them together and your kids have a hand (even if it's small) in what is accomplished!
bbringing beauty to the ordinary,


Cindy, that's the cutest thing ever! Isn't it fun to create with a daughter? Mine are grown but we still do these kinds of things together - here's the nightstand my youngest and I did last year when I was out in VA visiting (we redid her whole living room!): http://lovemydiyhome.com/antique-night-stand-re-do/. I need to try that shape tape. Did you find it adhered well enough to prevent bleed through?
ReplyDeleteThanks so much Val! Love your makeover too. The shape tape needs to be "burnished" before painting...you just run a credit card or something like that over the edges for sharp, crisp edges with no bleed through!
DeleteLove the new look and the creativity it represents. The fact that Little DIY helped makes it even more special!
ReplyDeleteI love it!!! The paint color is perfect and so cute with the shade and nightstand! My oldest daughter likes to help me DIY too but her attention span never makes it through the whole project and certainly not the clean up!
ReplyDeleteThanks Amanda! My daughter only made it through the first coat of the top, lol! And clean up??? She's nowhere to be found for that part :) Thanks so much for stopping to comment! Have a wonderful day,
DeleteThis dresser is just gorgeous!!!! Thanks for linking up to Inspire Me Monday! XO
ReplyDeleteThanks so much Kristin, it's a fun pop of color in Little DIY's bedroom ;) Have a great day!
DeleteWhat a totally charming room! I love the colors - so bright and happy. And what great team work!
ReplyDeleteYes, tweenagers like color, LOL! Thanks so much!
DeleteThat nightstand is too cute! I love the pink chevrons, and that frog tape is cool! The lamp is super cute as well. Great job!
ReplyDeleteAw, thank you T'onna for your sweet comments! I love this shape tape, it makes it so much easier!! I appreciate you taking the time to comment!
DeleteHave a great evening,
Super cute nightstand! Love! Thank you for sharing. You are one of the features tonight at the Make it Pretty Monday party at The Dedicated House. Here is the link to the bash. http://www.thededicatedhouse.com/2014/08/make-it-pretty-monday-week-110.html Hope to see your prettiness again at the party. Toodles, Kathryn @TheDedicatedHouse
ReplyDeleteYou where featured in the http://creativepinkbutterfly.com/pin-your-friday-favorite-6/ link party! Grab a featured button and link up to the new party! :)
ReplyDelete