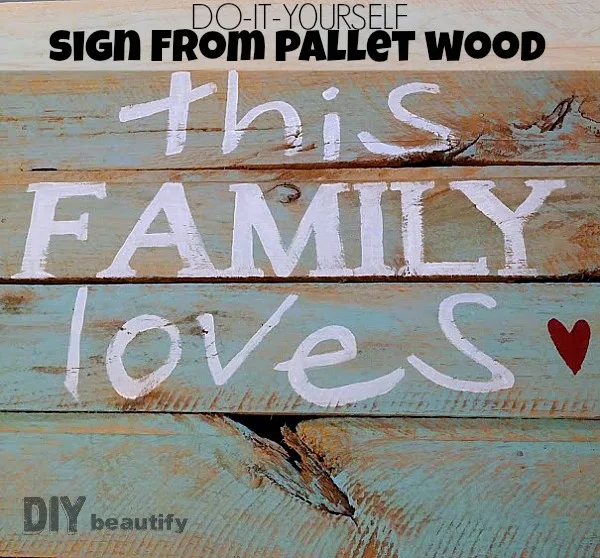
DIY Pallet Sign with Painted Phrase
A pile of old wood is a lot like families...
...weathered
... rough in spots and full of splinters
...many are discarded and untended
BUT full of potential!
Just like a family, with a little love and attention, an old weathered piece of wood can turn into something beautiful!
I became the happy owner of a big 'ole pile of junk wood last fall. A lot of it was old fence boards, but there was also a bunch of pallet wood which became a sign.
Painting a meaningful saying on a piece of rustic wood and hanging it on the wall not only adds warmth and character to a room, it adds personality!
And it's definitely a budget-friendly project!
I love the ability to customize a sign, because I can put the exact phrase I want to on the wood and make it sized to fit.
Mr DIY pieced this sign together from sanded pallet boards, offsetting each board slightly to add interest to the piece. *Denotes affiliate links. For my complete Disclosure Policy, click here.
Tip: when working with pallet wood, it's much easier to sand the boards individually before attaching them together for your project!
Once all the pieces were nailed together into a solid piece, I dry-brushed it with aqua chalk paint* (Americana Decor 'Refreshing'). I didn't want to completely cover the wood, but to keep it aged. After the paint dried, I went over it with my palm sander* to further knock back the brightness of the paint and add additional distressing.
After wiping off the sanding dust, I painted on my phrase, 'this Family loves' that I created.
The final step was giving the hand painted pallet sign a coat of clear wax* to protect it (and make it easy to swipe a dust cloth over it (not that I'm known for my mad dusting skills...but ya know, just in case!)
Okay, so how did I get the letters onto the wood? There are three ways that I've used in the past to transfer letters to wood and I'll share them each below:
1. Use a die-cut machine
This sign was created after my Cricut* machine died on me (it was over 10 years old) and before I purchased my Silhouette*, so I had to come up with another way to create the letters...and get them onto the sign. If you have a die-cut machine, it's definitely the simplest way to cut out your phrase to your desired size and add it to the wood.2. Transfer Method
I love using PicMonkey* for creating phrases and I typed my phrase, 'this Family loves', using my own fonts in PicMonkey, then saved it to my computer, opened it in Office, dragged the corners to make it bigger and printed it out onto multiple pages.The transfer method works best if you have a steady hand, and especially if the letters for your sign are curved. You can see step by step details of the transfer method on this Love sign that I made. You're rubbing chalk on the back of a printed copy of the phrase and then tracing over it with a pen. The chalk transfers on to your wood and gives you an outline that you can then fill in with paint.
TIP: use dark chalk when transferring to a light piece and light chalk when transferring to a darker piece; I would consider bare wood to be light, therefore I'd use white chalk.
3. Create a Stencil
The third method to getting your words onto wood is to create a stencil by hand cutting all the letters from paper, taping it and painting in onto your piece, just like I added the word 'COFFEE' to this painted hutch. It's the best method if most of your letters are straight lines. It takes a little bit of time, and a sharp craft knife*, but once you're done, the painting is easy and goes quick!Sometimes, I find that a combination of both is the way to go, and that is how I chose to approach this sign. Letters that had straight lines were easier to cut. Those curvy lines were easier to trace onto the pallet wood, and then paint by hand.

Just select the method that you're most comfortable with and remember to go light on the paint. Once the paint is completely dry, you can lightly sand it to distress before waxing.
I'm really happy with my handmade sign. The little heart adds a lively pop of color to the piece, and red and aqua is a delightful combination!
If you want to try your hand at making the sign shown here, feel free to grab the free printable below (for personal use only). You can insert it into a frame, or use it as a template to paint your own sign like I did!
If you do choose to make the sign, I'd love to see your finished piece!
What's your favorite method to creating signs with phrases? Have you made a pallet sign yet, or a sign from another piece of discarded wood?
As always, I'd love to hear from you!!
Your comments truly do make my day and motivate me to keep creating fabulous content!
bringing beauty to the ordinary,
Become a DIY insider!
You'll never miss a post, and you'll get all my FREE tutorials
and more...delivered straight to your inbox!
and more...delivered straight to your inbox!
Let's be Social! Follow along on Pinterest, FB, Twitter, Instagram
This blog's content is for entertainment purposes only and is not professional advice. By reading this blog and attempting to recreate any content shared on it, you assume all responsibility for any injuries or damages incurred. Read my full disclaimer here.


I love this!
ReplyDeleteThanks Kim😊
DeleteHolly, thank you so much for your kind words! I'm so happy to have you visit!
ReplyDeleteI love this! That's a great saying to display :)
ReplyDeleteThank you Jill
Delete