Rae Dunn Inspired Coasters in Four Easy Steps
Make DIY Rae Dunn inspired coasters for any season using my tips and tiles from the hardware store. Great gift idea for any Dunn fans!
Updated 4/2024
Affiliate links may be included for your convenience;
my full disclosure policy can be found here. If you click through and make a purchase I'll receive a small
commission at no extra cost to you!
Good morning! Are you ready for another easy Fall/Halloween tutorial?
This one is for all my fellow Rae Dunn fans, although it can certainly be
adapted to suit anyone!
Why you'll love these tile coasters
These DIY coasters are affordable, customizable and so easy to make! They make
wonderful gifts, especially for that person who's tricky to buy for! Customize
their set of coasters for a truly unique gift idea!
How to make Rae Dunn inspired coasters
You are going to love how easy these coasters are to make, let's get started!
Supplies needed:
- square glossy white tiles 4" square (check your local Habit ReStore)
- black acrylic paint and small brush
- damp paper towel
- Silhouette machine and black craft vinyl
- transfer paper/tape (this one is my favorite)
- cork roll or pre-cut cork squares
- hot glue
These tiles are so much fun to transform into usable and super cute coasters! They're already glossy white, which is the perfect background for your black skinny Rae Dunn-inspired words.
Step 1
The first thing you'll need to do is paint the edges of the tiles black. The
edges are not sealed, and they just don't look great left alone. But a simple
coat of black paint makes them really stand out!
I didn't tape, just painted the edges free-hand. I kept a piece of damp paper
towel to wipe off any excess paint that I got on the front. I didn't worry
about the back because that's going to be covered with cork anyway!
Step 2
Open up your Silhouette machine or Cricut. I like the font
THE SKINNY (available for free download
here)
because it looks very much like the Rae Dunn font. I use the regular one, not
the bold.
Decide what words you want to use on your coasters. The tiles are 4" square,
so create your cut file accordingly. I believe that my letters are about 2"
tall. You can choose to fill the tile, or make the words a little smaller.
Cut out letters onto black craft vinyl.
Step 3
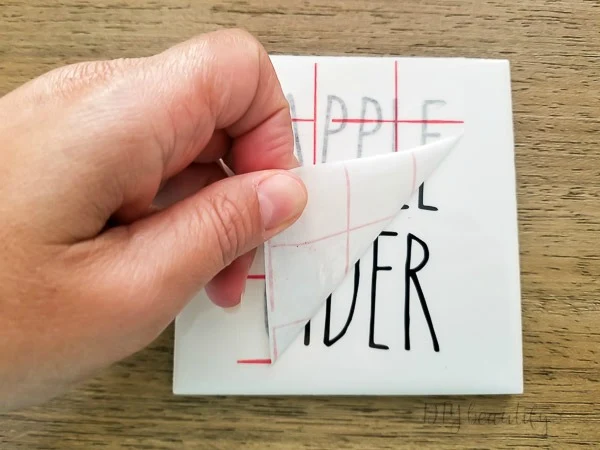
Use transfer paper to transfer your letters to your tiles, one at a time. I
centered my fall ones, but chose to offset my Halloween ones, as you'll see a
little further down.
This amazing transfer paper
is the key to getting your vinyl words centered every time!
Step 4
The last step is to cut cork to fit and glue to the back. I find the cork that
is sold in rolls is easy to cut with scissors. You don't want anything too
thick or you'll have a hard time cutting it!
Just like that you have an adorable set of Rae Dunn inspired coasters, perfect
for any occasion! Customize them to suit the recipient!
Tie with a piece of twine for gifting.
After being unsuccessful finding any Fall Rae Dunn items in stores, I made my
own! The pumpkin and the PUMPKIN SPICE mug above are both vinyl cut outs!
This Halloween set turned out really cute!
If you're already planning for Christmas, you can check out my
Rae Dunn inspired ornament
tutorial, which gives you tips for getting letters to lay flat on a round
surface! I've also done
Rae Dunn Easter eggs!
Please PIN this image and share this tutorial with a friend who loves Rae Dunn
too! Of course, if you're not a Dunn fan, you can use any font to create
beautiful coasters! They make great gifts.
bringing beauty to the ordinary,


WOW. Thank you.
ReplyDeleteCan't believe that I actually won. So exciting
Thank you
Colleen
ckb_49@yahoo.com
Congratulations Colleen, I just mailed your package so you should have it by Friday ;)
DeleteThese look great!!! I was wondering if you could tell me which kind of silhouette machine you have. I know you posted a link but Amazon gives me so many to choose from and I dont need any bundle stuff. Just the machine and probably the black paper to print. I really want to make these.
ReplyDeleteSure, I have the Silhouette Cameo. I bought the bundle because there are so many awesome freebies that come with it. But really, any one of them will work. I used to have the Cricut, and when it died I bought the smaller Silhouette Portrait. That lasted several years but I always felt limited by the smaller size. So that's why I bought the Cameo. Hope this helps!
Delete