How to Make a Beautiful Spring Wreath for Less!
This tutorial will show you how to make a beautiful Spring wreath using no hot glue, as well as a great tip to get 3-4 wreath forms from a single grapevine wreath!
Affiliate links may be included for your convenience; my full disclosure policy can be found here. If you click through and make a purchase I'll receive a small commission at no extra cost to you!
Welcome to the March installment of Thrifty Style Team, when a group of thrifty-loving blogging buddies share our ideas with you! We always come up with different, inventive ideas and you can find all the links at the end of my easy Spring wreath tutorial!
A Spring wreath is always a fun way to add some color and a breath of new life to your Spring decor! But, as I'm sure you know, they can be very pricey! So I'm here to show you how to make your own beautiful Spring wreath FOR LESS using gorgeous, beautiful blooms in that swoon-worthy blush that is all the rage this year! You're actually going to get TWO WREATHS in this tutorial!
Supplies:
Note: all my florals were purchased from Michaels at 60% off, unless otherwise noted
- grapevine wreath base
- 3-5 large blush peonies(I bought these ones and these ones)
- 4 stems of small blush peonies(I bought these ones)
- 1 stem of hanging white berries, separated
- 1 eucalyptus garland from Hobby Lobby (bought at 50% off)
- 1 white rose bunch from Dollar Tree
- 1 cotton stem, separated (optional)
- 1 pkg wood rounds like these
- paddle wire
- wire snips
* these flowers can be very pricey; but they DO go on sale, especially around holidays and long weekends! Keep an eye on them (I purchased mine online, with 60% off and free in-store pickup!) And yes, I know there's a nest pick in the image below, but I didn't end up adding it to either of my wreaths 😉
Before we get into the nitty gritty of how to make these beautiful Spring wreaths, I want to share my tip for getting the most out of a grapevine wreath form! Grapevines wreaths make a great base for so many DIY wreaths, and this trick will show you how to get 3-4 forms from a single wreath! Watch this short video!
How to Make a Spring Wreath
Prep Wreath Form
Follow the directions in the video to separate your grapevine wreath. The beauty of doing this is that you can decide how big you want your wreath to be! Use craft wire to secure grapevine together in several places so it holds its shape nicely. I mentioned in the video to go outside to disassemble the wreath...but I didn't say WHY...it's 'cause it's CRAZY MESSY!! And who wants to sweep when you don't have to?
I added a single eucalyptus garland to the larger wreath, but didn't do the same on the smaller of my wreaths. You can see in the picture above that I lightly sprayed the grapevine white. Totally personal preference. Now that both wreaths are done, I do prefer the garland!
Tip: when wiring items to your wreath, try to do it in an inconspicuous area (like behind a leaf) so it's not really seen at all!
Just in case you're confused, the tutorial beyond this point is with the smaller wreath. When I was making the larger one (wrapped in eucalyptus), I wasn't sure if I could get away without glue so it was definitely an experiment and I didn't take pictures along the way!
Experiment with Flower Placement
Before I started attaching florals to my wreath form, I laid them out to see how I liked them best. Normally I would recommend 3 large flowers for the center focal point, but because these dahlias are so big, I can get away with just 2.
Trim Stems
The florals I purchased are beautiful quality with long stems that needed to be shortened to work on a wreath! Once I knew where I wanted the flowers, I knew how much of the stem to cut off with the wire snips. I pulled off the large leaves from the big dahlias because I knew I wanted to use them somewhere on the wreath.
Start with Main Florals
The large dahlias are the main flowers in this wreath so I added them first. You can see how short I cut the stems. To attach them to the wreath without any glue or wire, I poked the stem down through the grapevine, and then bent the stem at the back and tucked it into the grapevine. The stems are thick enough that they held well without anything else (plus they have a thick wire center)!
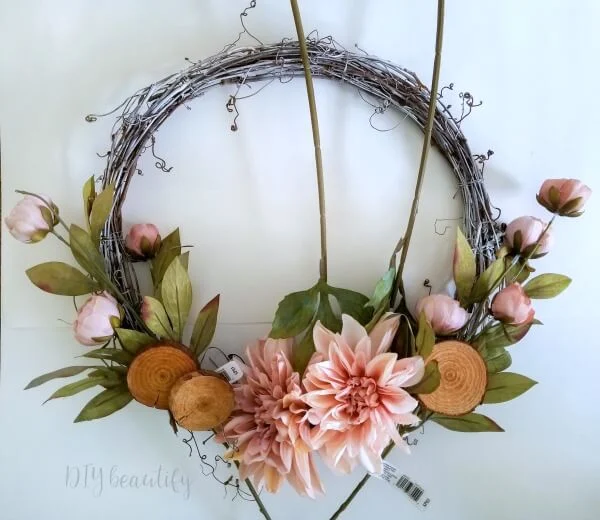
Here's what it looks like from the front....so pretty already, right? In fact, you could stop right here and have a beautiful minimal Spring wreath for only about $10!! But let's keep going...
Add Complementary Florals
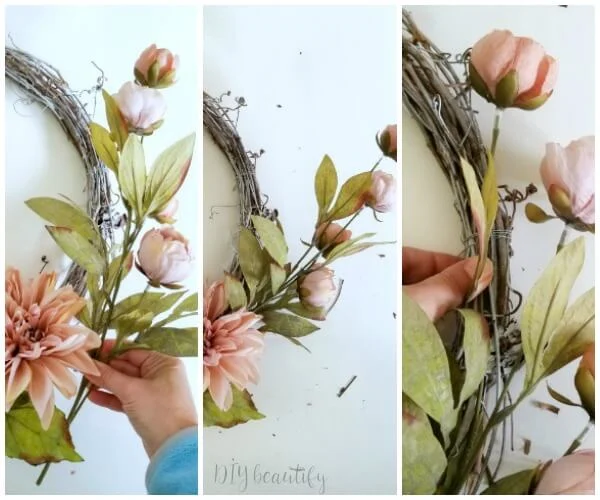
Next, I figured out where I wanted the small peony stems by holding them up next to the wreath. Once I decided where it look good, I did the same thing by tucking the end of the stem into the wreath, on an angle this time, rather than straight down. You can see in the middle image below how the flowers poked out from the wreath form once the stem was attached. A small piece of wire wrapped around the stem and grapevine took care of that!
I followed the same formula to tuck in the hanging white berries, although I separated each spring of berries from the main stem, and instead of hanging down, they're tucked in amongst the other flowers. I also added the leaves from the large dahlias to areas that looked a little bare.
Glue Wood Rounds
Okay, I lied! I did have to use some hot glue on this wreath! The wood rounds needed glue to stay put, but I didn't use ANY glue on the other wreath. I'll share both finishes wreaths below. Here is the finished wreath with the wood rounds. I like the little bit of rustic it adds to this Spring wreath. This one is going on my Spring decorated mantle, which I'll be sharing very soon!
Aren't these flowers amazing? I spent $45 on all the florals for both wreaths, which makes these wreaths about $23 each...not bad!
And here is the larger wreath. This one also has white roses and some cotton (that I already had), and I think it feels much more shabby cottage, which is perfect because that's how I'm decorating my dining room for Spring (more to come on that!)
I'd love to know which of my DIY Spring wreaths you prefer...the larger, garland wrapped one...or the smaller one with wood rounds...please let me know in the comments below!
Be aware that while items are attached securely for indoor use, if you are going to use this wreath outside, even on your front door, you should use a more permanent and secure way to attach the elements so you don't lose anything on a windy day!! 😉
If you liked this post, please consider sharing, pinning, etc with your friends! The more eyes I get on my blog, the better for my business...which ends up being better for you because I'm able to share more quality FREE content with you! Thank you SO SO MUCH for your support! 😃
Let's see what my fellow Thrifty Style Teams members came up with this month!
bringing beauty to the ordinary,
Become a DIY insider!
You'll never miss a post, and you'll get all my FREE tutorials
and more...delivered straight to your inbox!
and more...delivered straight to your inbox!
Let's be Social! Follow along on Pinterest, FB, G+, Twitter, Instagram
Popular Posts You Might Have Missed
This blog's content is for entertainment purposes only and is not professional advice. By reading this blog and attempting to recreate any content shared on it, you assume all responsibility for any injuries or damages incurred. Read my full disclaimer here.


For the guest book at my younger daughters wedding folks signed wood slices. You've got me thinking of displaying them on a wreath she can enjoy all year long.
ReplyDeleteAlways happy to inspire! That sounds like a great idea!
DeleteCindy your wreath is beautiful! I love the colors you chose and it's very doable!
ReplyDeleteThanks so much Susan!!
DeleteSimply beautiful. Thanks for sharing two ways to create your lovely wreaths. You have such a pretty style.
ReplyDeleteThanks Meegan!
DeleteThis is a gorgeous wreath, Cindy! I love the different colors and textures you used! So perfect for spring! Great teaming up with you again this month! Xoxo
ReplyDeleteThank you Kristi!!
DeleteCindy, I love your tips on your video. I would never have thought to break apart the grapevine to make multiple wreaths. great idea.
ReplyDeleteThanks so much Laura!!
DeleteNot sure if my comment took, so I'll try it again :) It's just so beautiful. I want to make one asap.
ReplyDeleteThanks Deborah!! I hope you make one!
DeleteI know what you mean about the mess that taking apart grapevine wreaths can create! I took apart a bunch of them to make a grapevine tree using a tomato cage. I never posted about the project because I wouldn't want anyone to go through that! Both of your wreaths are gorgeous and I'm crushing on that blush color this spring, too!
ReplyDeleteHaha, it is messy! Thanks Jane!
DeleteCindy - you are a genius! So clever to take apart a grapevine wreath. Your video and tutorial are amazing. You have a way with floral design too! This is such a great idea for people like us that like to change our wreaths all of the time!
ReplyDelete