Thrifted Wood Pedestal and Cloche Makeover
A dated wood pedestal from the thrift store is stripped back to its natural color and combined with a thrifted glass cloche for endless decorating possibilities! Read on for this easy oven cleaner wood stripper method.
Filling my home with thrifted goodies has been a fun and rewarding way to curate a decorated home on a dime! You never know what you might find at the thrift store! This recent wood pedestal find was combined with a previously thrifted glass cloche. Read on to find out how I removed the old stain from the pedestal with oven cleaner.
How to Easily Strip Stain from a Thrifted Wood Pedestal
This post may contain Amazon or other affiliate links. As an Amazon
affiliate I earn from qualifying purchases.
My full disclosure policy can be found here.
I recently found this wood pedestal stand at the thrift store for $2.99. I
knew it would pair well with a glass cloche (also thrifted) that I already had
at home, but first I wanted to give it a little update.
If you've never heard of removing stain with oven cleaner, it's a method
that's been popular for a couple years, I first saw it used by Natalie of
My Vintage Porch.
Advantages of stripping stain with oven cleaner
- it's inexpensive
- it's easy and less messy than many furniture strippers
- the cleaner and the sun do 90% of the work!
I was eager to try stripping the dark wood pedestal with oven cleaner to see
if I could lighten and give it more of a vintage cottage look. If you love
bleached, lightened, natural wood tones, this is a great project to try!
Read on for some tips and things you should know before beginning.
Pedestal before
But first, here's how the pedestal looked when I bought it. In person, the
color was more orangey than it looks. It also felt a little stumpy, but I had
an idea to fix that! I had a small piece of threaded spindle that I'd removed
from another project (I believe this piece is from Hobby Lobby) that I planned
to use.
Upon closer inspection, I realized the pedestal was three pieces screwed
together, and they could easily be unscrewed and separated. That small piece of
spindle could give it some more height. But first, that orange stain needed to
come off!
Oven Cleaner Stain Remover Method
I've read several tutorials on removing stain with oven cleaner, so I prepared
my supplies and picked a warm sunny day. Here's what I used. Read on for
instructions and my best tips.
Supplies
- Easy Off Fume Free oven cleaner
- disposable gloves
- scrub brush
- soapy water (Dawn dish soap)
- a piece of cardboard
- sanding sponge
Step 1 - prep
You don't really need to prep the wood piece because the oven cleaner will remove grime as well as stain. But you should prepare the surface you're working on. You don't want to spray the oven cleaner directly onto concrete or your patio! I used a piece from a cardboard box on the grass, just to keep the grass off my pieces. This also allowed me to move the pedestal without touching it - more on that below.
Step 2 - Spray
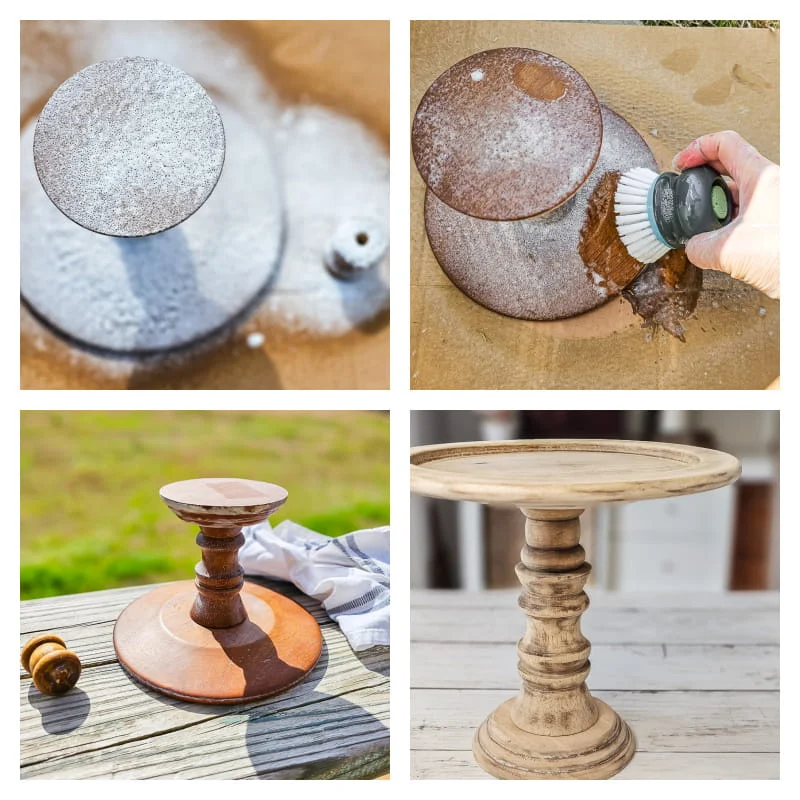
Generously spray the oven cleaner on all surfaces. You want a nice, thick coat of foam.
Step 3 - Wait
Allow the oven cleaner to sit on the piece for about 20 minutes. It works best in a spot out of the sun so the sun doesn't dry it too quickly. I picked up the entire piece of cardboard and moved it to a shady corner on my patio. I knew the process would probably need to be repeated a couple times.
Step 4 - Scrub
I brought the pedestal into my kitchen sink and scrubbed it with Dawn dish soap, known to clean oil slick off baby ducks! Don't be surprised if very little visible stain is removed at this point. If you're working with a larger piece, hose it down outside. Be sure to rinse well to remove all the chemicals, otherwise it will dry with white patches.
Step 5 - Sun
Dry the piece with a rag and set outside in the sun. This is where the magic happens as the wood completely dries and lightens. Getting the piece wet in the previous step causes the wood grain to rise and as it dries it will lighten.
Step 6 - Repeat if necessary
The solid wood pedestal had a really shiny, stubborn stain that didn't want to budge. It took 3x of repeating the above process to notice a difference and even then, I had some of the darker wood refuse to budge. How your wood piece reacts to the oven cleaner all depends on the specific piece, how many coats of stain, the age, etc. So this isn't an exact science, but using the oven cleaner is certainly less mess than other stain removers I've used in the past!
Step 7 - Sand
After repeated washing in water, the wood can become very rough. Once I was happy to see the majority of the dark stain disappear, I used 120 grit sandpaper both to smooth the rough surface and to remove a little more of the stubborn stain.
Tips before you begin
Before you try this method of removing wood stain with oven cleaner, read
these tips:
- Be sure the piece is solid wood. If it's veneer, this method will damage the piece.
- Don't try this method on a treasured antique as the results are too unpredictable! Look for an inexpensive item at the thrift store to experiment with this method of stripping stain.
- The oven cleaner method will not strip paint from wood. You'll need another product, like Citristrip.
- If you're working on a large piece of furniture, use a hose to rinse the oven cleaner off, and rinse until the water runs clear to avoid white residue.
- If you do see white residue on the piece once it dries, you can use mineral spirits or rubbing alcohol to remove it.
- Let the piece you're stripping fully dry before adding more cleaner. You will be amazed at how much it lightens in the sun!
Is a Protective Top Coat Necessary?
You have options here. If you are working on a piece that will get lots of
daily use (like a tabletop), you will want to add a protective layer. But be
aware that the natural wood tones can darken slightly, and even turn orangey.
This product, by General Finishes, is water based and the one most recommended on light,
natural and even white painted furniture, to prevent color change.
I did not apply any topcoat to my wood pedestal as it will mostly be used for
decoration. If I decide to use it at the kitchen sink at a later date, I will
likely apply a protective coat.
Putting the pedestal together
After my wood pieces were lightened back to their (mostly) natural color, I
separated all the pieces so I could add that little extra spindle to add
height.
And then I used a little
wood glue
to attach the base to the top of the pedestal and let it dry.
The added piece of spindle isn't a perfect match, but it's close enough and
has the right light, natural tones of a bleached piece of furniture.
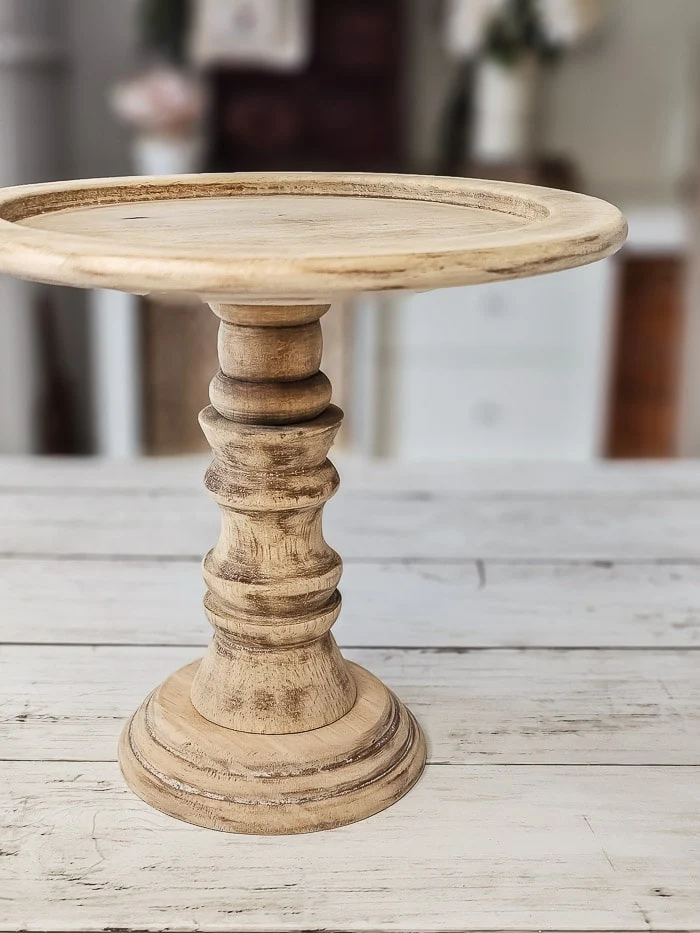
Here's a look at the difference the oven cleaner stripping method made to this
thrifted wood piece. Pretty remarkable, right? My thrifted wood pedestal and
cloche reminds me of
this piece from Antique Farmhouse!
Later this week I'll share a multitude of ideas for styling a wood pedestal
and cloche together. These pieces are so useful and there are many decorating
opportunities. Be sure to
subscribe to my posts
so you don't miss a thing and keep reading to see what thrifted items the
Thrifting With The Gals team is sharing today!
Rachel of The Ponds Farmhouse
is next, and she has some amazing concrete statuaries that she uses indoors
and out!
You might enjoy these related DIY projects:
Pin to Save This Idea!
More Thrifting with the Gals Ideas to Inspire You!
You don't want to miss these amazing ideas for decorating with thrifted finds!
Click on the links below for more details.
Dabbling and Decorating - Cottage Farmhouse Decor Trending Finds
Robyn's French Nest - 9 Easy Tips to Mix New and Vintage Home Decor Pieces
White Arrows Home - Collecting Old Clocks
The Ponds Farmhouse - Vintage Garden Concrete Statuaries
Lora Bloomquist - Recent Vintage Thrifted Finds
DIY Beautify - you are here!
bringing beauty to the ordinary,


Good morning Cindy, love how this cake stand turned out, it looks so classic and the cloche on top is even better! Thanks so much for joining us today. Always happy to have you. Pinned!
ReplyDeleteThis turned out so cool, Cindy! Love the rustic vibe. I haven’t tried this method yet; thanks for the great explanation.
ReplyDeleteCindy, I love your thrifted finds. Both pedestals and cloche are favorites of mine. I've not tried the oven cleaner stripping method yet. Thanks for the detailed instructions. I'm so happy you joined us this month.
ReplyDeleteThanks Rachel!
DeleteCindy, I'm so glad you joined us this month and I love how this project turned out! Absolutely beautiful!
ReplyDelete