Farmhouse Modern Laundry Room Reveal
We gave our builder-grade laundry room a fresh and fun modern farmhouse makeover for less than $200! Come and see all the projects that we tackled to make this space beautiful.
One of my dreams is to live in a big rambling farmhouse, with a wraparound porch and acres of land.
Since I'm on a budget, and the house of my dreams isn't in the cards...yet...I have to make do with what I have. What I have is a typical suburban home, with a lot of builder-grade (boring) features and not a lot of charm. We are slowly working to add a little of that farmhouse charm to our home. The Inspiration Board above was the look I was going for with our laundry room makeover.
I'll let you be the judge of whether or not we achieved our goal.
Before we look at what was accomplished in this space, we need to take a look at where we started. I'm trying to keep it real here so you can see how far this room has come, but I'll admit this picture still makes me cringe! Big time!
Our laundry room was tiny, lacked function and definitely lacked style!
Well, not anymore! Mr DIY and I have been hard at work, making this little ugly box a charming space!
The first thing we did was paint the room and add large peel-and-stick tiles to the floor, laid on the diagonal. You can read all about this inexpensive flooring option here. This is a great, budget-friendly alternative to stone tile because you get the same look for a fraction of the cost.
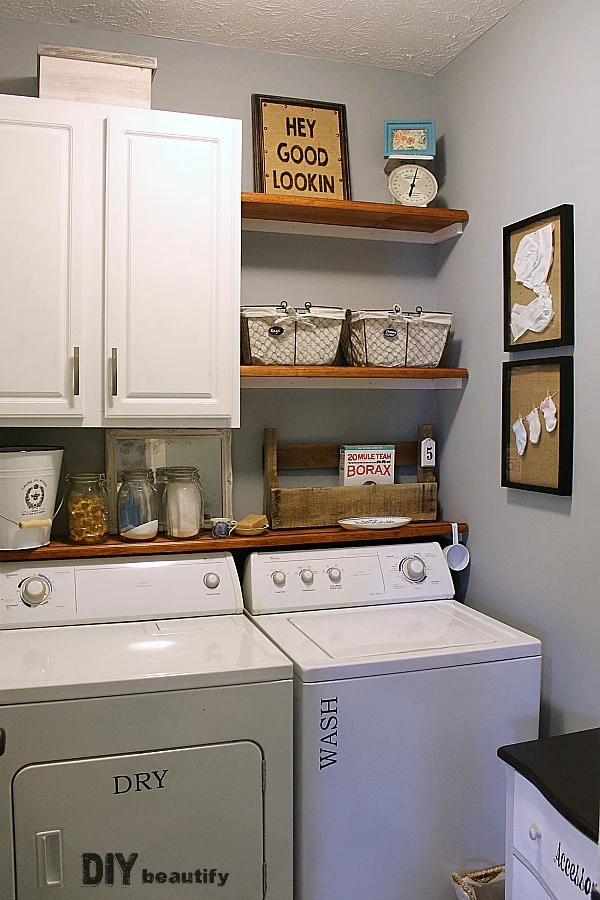
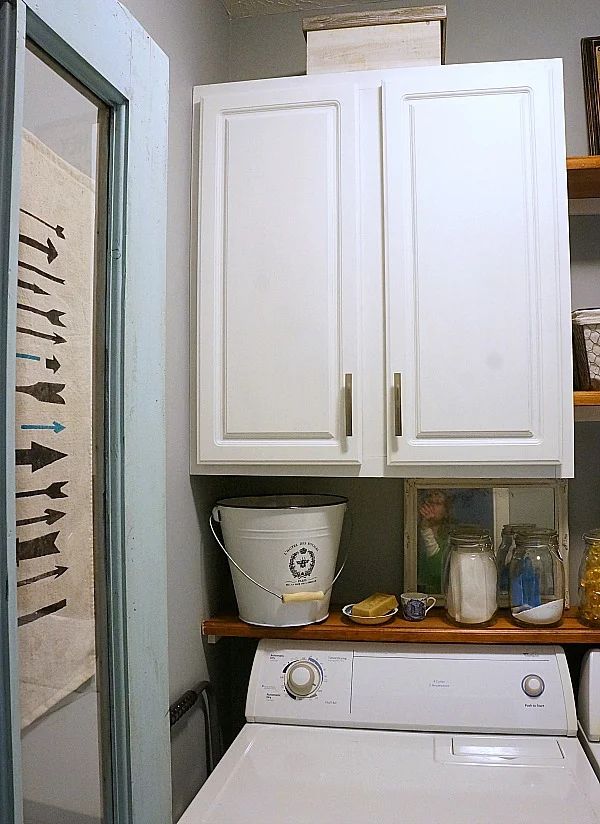
After removing the wire shelf, we added a painted cabinet and farmhouse-style shelves for tons of storage! We realized that a hanging rod (for shirts to dry) that was in the original plans wasn't going to work...unless I was 7 feet tall (and I think I'm done growing!), so we added an extra shelf where the rod would have gone.
The challenge we faced with the shelves was how to disguise the water faucets. Do you see them above the washer? Nope...because they're cleverly hidden but still accessible. Click here to find out how we added the cabinet and shelves and disguised the water faucets.
The cabinet holds all my cleaning supplies. I love that I can close the door and not see them. Previously, they were in my face, messy and unorganized.
I had fun styling the shelves with a mix of decorative and functional elements. Baskets hold cleaning cloths, mason jars store laundry products. The burlap stenciled sign you see below is available as a free download for all my subscribers! Click here if you want to make your own burlap stenciled sign.
Another challenge we faced in this space was the huge electrical box that took up a large portion of one wall. Here it is, about as ugly as they come...
It's no longer an eyesore because I created a really cool solution to cover it up. Click here to see my DIY solution to an ugly electrical box.
You may find it impossible to believe, but in this tiny space I even had room to tuck a small,
upcycled dresser! It holds our winter and summer gear, and is also a nice surface for holding clothes after they've been folded.
I painted a laundry definition sign, and it adds some much-needed character to the big blank space above the dresser. A hook holds our broom and Swiffer.
We bought a couple of antique doors at the Nashville Flea Market last year for a ridiculous price ($15 for both!), and used one of the antique doors in place of the solid one we had. This one has windows and allows you a peak into the room as you pass by. I'm not embarrassed anymore to have people see this space! I'm proud to show it off!
I have to give a public shout-out to my man, Mr DIY, for all the work he did to get this door to work for this space! The door was in fairly rough shape (that's why it was so cheap!) and it needed some love. He had a big honey-do list for this project!
This post may contain affiliate links, which are always products I personally recommend! My full
disclosure policy is available here.
- removed the old hardware and sanded all the rust off with his Dremel
- added the door knob from the other antique door because this one had none (and the other door was too short to use)
- filled the old hinge holes and used a router to create new ones so they'd match the ones on the frame
- added a latch mechanism
- moved the strike plate down about 2 inches so the door would close and latch properly
- bought and installed new glass
- ...and finally, hung the thing up!
All I did was paint it...and supervise :)
Our farmhouse modern laundry room is such a huge upgrade from the boring, builder grade look we had before!
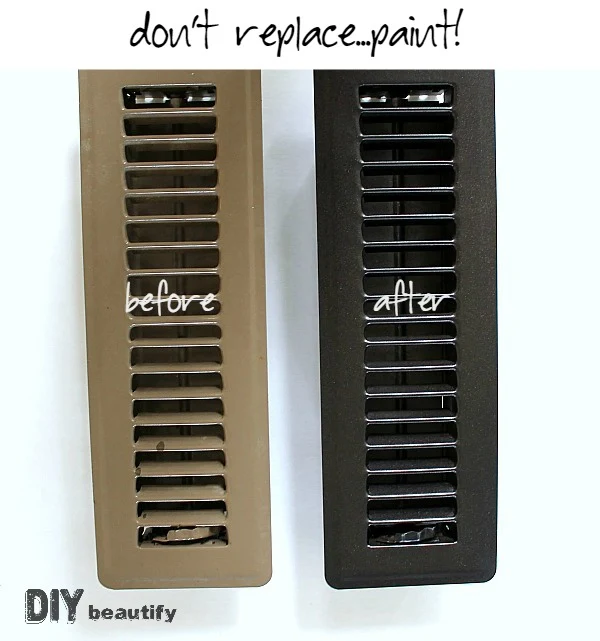
We spray painted the existing vent and the antique door knobs with
dark bronze metallic spray paint to freshen them up, and finished off with a
satin clear enamel topcoat. They look brand new!
I feel like I got a new laundry room! This space is not only organized and functional...but it's fun, charming and oozes farmhouse appeal.
While I'll never love doing the laundry, coming into this room brings a smile to my face now, instead of a groan.
Other simple touches include adding
vinyl labels to my old machines for a bit of personality!
Treasured baby items that were packed away in the attic were brought out and framed in shadow boxes and hung on the wall. The burlap background adds texture and more farmhouse appeal and I love seeing those sweet little items on display!
Besides the hanging rod, the other item we were unable to include in this room was the
schoolhouse pendant light fixture. It wasn't feasible to replace the light we have. The ceiling is too high and we would have actually lost light. So, the old fixture stayed.
Maybe the best part about this laundry room makeover might be the money we spent (or should I say the money we
didn't spend).
Here's the breakdown of where our money went for this
farmhouse modern laundry room update:
Cabinet - $30
Antique door - $7.50
Wall hook for brooms - $4.00
Paint - free (I used what I already had)
Miscellaneous painting supplies - $15
Sturdy step ladder - $30
Paint - free (I used what I already had)
Miscellaneous painting supplies - $15
Sturdy step ladder - $30
Total spent - $172.50
Some of you are probably saying,
"Wait, What?? That's all??"
Isn't that amazing? From boring to Wow for less than $200!
Here is a SOURCE LIST for other products used in this space (that I already had):
Chicken wire storage baskets
French enamel bucket (similar to this one)
XL glass jars
Shadow box set
You too can take your boring, builder-grade laundry room and give it a budget-friendly farmhouse makeover too! Shop smart and don't be afraid of a little hard work and do-it-yourself projects!
Pin this image for reference
If you haven't read all the tutorials for the projects included in this fabulous Farmhouse Modern Laundry Room Reveal, simply click the above links to be taken to each individual project.
So would you say we achieved farmhouse charm in this laundry room makeover? Is there anything you would add, or something it still needs (besides a robot to actually do the laundry for me)?
These projects are so do-able, I hope you're inspired to try one (or all) of them for a room in your own home!
If you love farmhouse style, and want to see my newest laundry room makeover for under $100, click HERE.
If you love farmhouse style, and want to see my newest laundry room makeover for under $100, click HERE.
bringing beauty to the ordinary,
Become a DIY insider!
You'll never miss a post, and you'll get all my FREE tutorials
and more...delivered straight to your inbox!
and more...delivered straight to your inbox!
Let's be Social! Follow along on Pinterest, FB, Twitter, Instagram
This blog's content is for entertainment purposes only and is not professional advice. By reading this blog and attempting to recreate any content shared on it, you assume all responsibility for any injuries or damages incurred. Read my full disclaimer here.


Looks fantastic!
ReplyDeleteThanks Jen!
DeleteSo many great ideas! Your laundry room looks amazing. I got the link from the Bloggertunities share thread, and I'm sharing this on my Fri Faves this week. Thank you for the inspiration.
ReplyDeleteAwesome, thanks for the share Laurie! I'll be sure to check out your Friday Faves! So happy to have you visit :)
DeleteWhat a difference! So much detail! Mr. DIY did a fantastic job and I bet it wasn't easy.
ReplyDeleteBeautiful laundry room, congrats. :D
Thanks so much for all your sweet comments! We are thrilled with it!
DeleteOh Cindy! I am dying over that awesome $7.50 door! That is the perfect finished touch for your fabulous laundry room makeover!
ReplyDeletePinning and sharing!
I know, right?! I think I squealed when the guy quoted the price!! Thanks for the share and pin!!
DeleteI just subscribed and tried to get printable, but it ask me to log on to Facebook, which I don't subscribe to, you should mention that you have to have a Facebook account because I wouldn't be so frustrated going round and round. I enjoyed your web site, loved your laundry room and think that I will have to get a cabinet like you did and get rid of clutter on wire shelving
ReplyDeleteI am sorry you are having trouble. You shouldn't need to log into FB because the free printable doesn't have anything to do with FB, you should receive it into your inbox as a separate message from me. If you message me with an email address, I can send you the printable.
DeleteIf anyone else is having difficulties getting the printable, please let me know. Thx.
What a transformation Cindy! I love the shelves, I've been thinking of doing that in our laundry room too, and that old door is perfect!
ReplyDeleteThanks Emily, I'm loving it! I was so excited to find the antique door...gotta give kudos to my hubs for the shelf idea!
DeleteLooks beautiful! Love that you were able to be so frugal. This makes me motivated to finish mine up. :)
ReplyDeleteSo glad I inspired you, Ginger...it's great to get this room finished and looking beautiful and functional at the same time!
DeleteThis is beautiful! I love it! I'm sure it will make doing laundry a bit more enjoyable.
ReplyDeleteThanks Julie, you're right, it is more enjoyable to do laundry is a room that functions better and is attractive to look at!
DeleteWow, wow, wow! Love everything about it. I have a laundry room very similar in size and I am so keeping these ideas around when I get around to giving it a makeover. The door is my favorite part!
ReplyDeleteThanks Rachel, I hope you're able to use some of my ideas! The door might just be my favorite part too.
DeleteFabulous, Cindy, I'm duly impressed! You and your husband did a wonderful job. I truly think that doing reno on a tight budget brings out our creativity and resourcefulness, resulting in an even better, more unique look. Your talent shines through! ~Ann
ReplyDeleteThank you so much Ann! It was definitely a joint effort, and I agree that this one stretched us creatively but I'm so happy with it!
DeleteFound you from I Heart NapTime! I am in LOVE! Where did you purchase the peel & stick. I am normally not a fan but looking at yours made me say WOW! we have a whole house organization project and reno going on and laundry room is still on our list at http://renovardesign.com
ReplyDeleteThanks so much Jenny! We purchased our floor tiles from Lowes. I'm with you, never would have considered them until I saw another blogger do a similar reno and loved the look. I think the two-tone gives it a much more high-end look. Good luck with all your renos!
DeleteLove the black and white tiles!
ReplyDeleteI appreciate your comment Cindy, I'm glad I decided to go with 2 different colors...it makes the floors more dramatic!
DeleteLooks great! I like all the updates you made! I found you through Simple Detail Linky!
ReplyDeleteThank you Alaya.
DeleteThis is amazing!!! I want to do laundry in there!!!
ReplyDeleteThanks for being a part of Best Of the Nest!
Thank you Mary Ann...you are welcome to come and do my laundry any time, lol!
DeleteBravo Cindy!!! And Mr. DIY ! You definitely achieved farmhouse charm with function. The door is a great addition to carry the theme forward.
ReplyDeleteAll the best.
Sharon @ zoesfrontporch
Thank you so much for your sweet comments Sharon! I'll pass on the kudos to Mr DIY...I really couldn't have accomplished this room without his help!
DeleteCan you please tell me how you covered up the 'eye sore' panel? I have one also and it's huge! momto2boys81@gmail.com Thanks so much!
ReplyDeleteAbsolutely! Here's the link http://bit.ly/1EZUHkR
DeleteIt was an easy fix and I love that it looks like a trendy piece of art, yet it's still functional when we need to get to the breaker box.
Hope this helps!
Where did you get the cabinet?
ReplyDeleteWhere did you find the cabinet for $30? Very nice!
ReplyDeleteThank you, I found it at my local Habitat ReStore!
DeleteHow did you hang your shelves? I bought brackets and they failed every time! Laundry room looks great!
ReplyDeleteThank you! Mr DIY tackled that project, you can read more about it here: http://www.diybeautify.com/2015/03/how-to-DIY-storage-builder-grade-laundry-room.html
DeleteJust came by cause I pinned your awesome laundry room reveal.
ReplyDeleteThanks for sharing.
I had a reveal a few years ago and I love it too. FABBY'S LIVING Blog
I'm in love! My tiny laundry room looks a lot like yours did in your BEFORE picture. :) I get frustrated with the original owner/builders of our house because our laundry room has 3 doors going into it (door from the kitchen, door to the garage, and door to the back patio. We are definitely not door poor!) I shared your post with my hubby, and I think I may have talked him into helping me. We just have to add the shelving (thankfully there's already a cabinet much like yours on the wall). Now I just need to track down a gorgeous antique door! Thanks so much for sharing this beautiful DIY project! Also, what paint color did you use...it's fabulous! :)
ReplyDeleteThanks Sarah! 3 doors?? That's definitely a challenge! I shared all the projects for this room... links should all be in this post. The paint color was a custom mix of 2 leftovers from other projects...a creamy white and a gray/blue. Sorry but i don't remember the names.
DeleteThanks Sarah! 3 doors?? That's definitely a challenge! I shared all the projects for this room... links should all be in this post. The paint color was a custom mix of 2 leftovers from other projects...a creamy white and a gray/blue. Sorry but i don't remember the names.
Delete