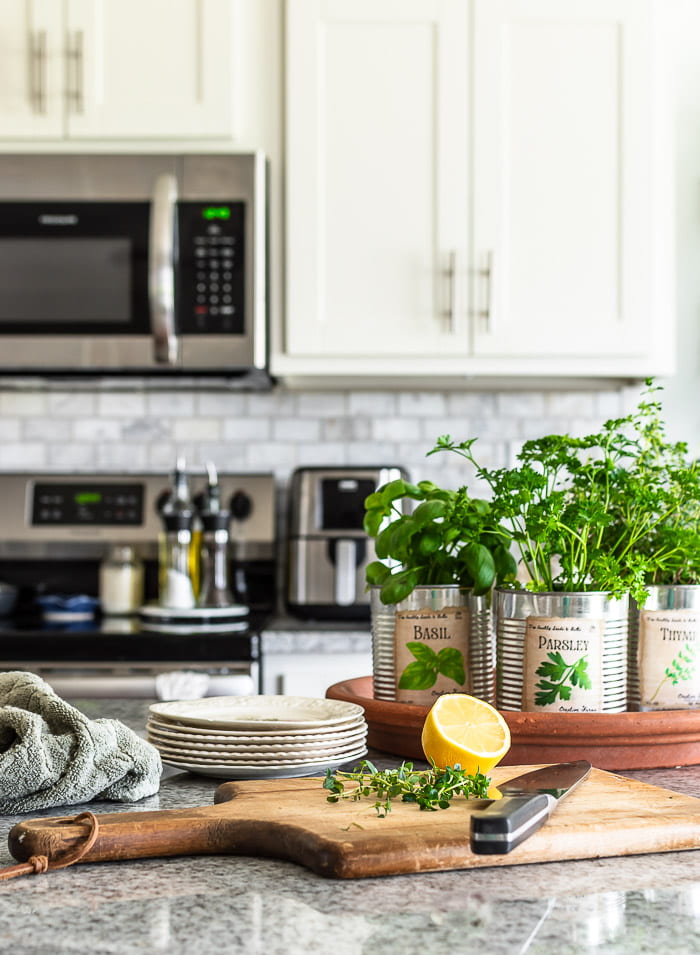
Vintage Inspired Tin Can Herb Planters
Tin cans are recycled as herb planters with vintage inspired labels. Enjoy fresh herbs all season long in your kitchen or on the patio.

Do you enjoy using fresh herbs in the kitchen? Herbs smell incredible and are
a healthy way to add flavor to everyday foods. Keep them on hand by planting
them in upcycled tin cans and keeping them in a sunny spot. More tips to
follow.
Easy vintage inspired tin can herb planters
This post may contain Amazon or other affiliate links. As an Amazon
affiliate I earn from qualifying purchases.
My full disclosure policy can be found here.
Fresh herbs are a staple in my kitchen. Whether I'm enhancing tomato-based
sauces, adding them to
soups,
stews and chilis or
this yummy appetizer, I love to keep fresh herbs on hand. There is nothing quite like freshly
chopped basil and parsley added to chopped tomatoes from the garden, a
little salt and olive oil! I love to make a meatless dinner and serve the
herb tomato mixture over pasta.

Why you'll love these tin can herb planters
- herbs are versatile, easy to grow, smell amazing and have many health benefits
- fresh herbs contain higher antioxidant levels than dried herbs
- this is a great project to reduce, reuse and recycle kitchen tins, and keep them out of landfills
- this project is easy enough to do with kids
- tin can herb planters make great gifts, especially when you add a printable label
- herbs will continue to grow indoors in a sunny location, or set them outside on the patio
Let's make some fresh herb planters using recycled tin cans

Supplies needed:
- 28 oz tin cans
- nail and hammer
- Mod Podge (if you'll keep the herb containers outdoors, use outdoor mod podge)
- foam brush
- printable labels (I used these ones)
- coffee filters
- potting soil specially for herbs and veggies
- herbs (I used lemon thyme, basil and parsley)
- coffee stain (recipe to follow)
Step 1 - prep tin cans
Remove lid from tin cans using a
can opener
that leaves smooth, rather than sharp, edges. I recommend 28 oz cans if you'll
be planting herbs from the home improvement store.
Pull paper label off, and remove the gummy residue with an
adhesive remover. Wash cans with hot, soapy water and dry.
Using a hammer and a nail, poke several holes into the bottoms of the can. I
was going to use the drill, but Mr DIY told me that drilling into aluminum can
dull the drill bit. Huh, learn something new every day! So I let him
hammer the holes for me 😉😍

Step 2 - prep vintage inspired herb labels
I was going to make my own printable herb labels, but I spotted
these vintage inspired seed packet printable labels online and they had the very ones I needed! And they were free to use,
so that's what I did!
Print labels onto regular copy paper.

Adding Vintage Style to Seed Packet Labels
If you want to use the herb labels as is, that's fine, just cut them out. They already have a
vintage style background but I wanted to tear, instead of cut, the edges because
tearing adds just a little more tattered charm. To do this easily, I first
brushed the edges of the labels with a little coffee stain. Why? Because
dampening the paper allows it to be easily torn.
Pro tip - keep your finger against the paper label to keep from tearing too
much.
Coffee stain recipe - Add the following to a glass storage jar with lid:
- 1 cup hot water
- 1/2 cup instant coffee granules
- optional - 2 Tbsp vanilla
Will keep in the fridge for months.


Step 3 - adhere labels to tins
Simply brush on Mod Podge to the backs of the labels and place them onto the
tin cans. Apply a coat of decoupage medium to the tops of the labels. Let
dry and repeat a couple times. This will protect them from any moisture. If
you plan to use the tin can herb planters outdoors, I recommend multiple
coats of the outdoor MP. If you'll be using the herb planters indoors, one
coat is enough.

Step 4 - plant tins
When the Mod Podge has dried, plant the herbs. I recommend doing this outdoors as it can be messy.
Follow these steps to plant the fresh herbs into tins:
- Place a coffee filter into the bottom of the tin (or a few small pebbles)
- Add a small scoop of potting soil
- Carefully remove herb from store pot
- Loosen roots slightly if they seem bound
- Add plant to tin and fill in with more potting soil, pressing down slightly
- Water your freshly planted herbs

If you want to keep the herbs indoors, find a sunny location (they should get
at least 6 hours of sun). A sunny windowsill is perfect. To keep the planted
herb tins on a table or island, use a large terracotta planter base. You can
even fill it with small stones and add a little water to keep your herbs
happy!

How to enjoy fresh herbs in your kitchen
- Chop parsley and add to a salad or fresh salsa
- Chop basil and parsley together and add to any pasta dish
- Use thyme or rosemary in soups and stews
- Add a couple mint leaves to your iced tea
- Make your own dried herbs in the microwave! Simply rinse, pat dry, lay in a single layer on paper towel, cover with paper towel and microwave in 30 second increments until dry. Crush and add to glass spice jars
- Wash herbs lightly before using, just rinse and pat dry. The easiest way to chop them is to first roll them up. Or you can use a pair of herb scissors.
Try planting flowers in recycled tin cans for a pretty pop of Spring color in
your home!
Pin to Save


This is a cute idea and I could totally manage an herb garden this way!
ReplyDeleteIt's so easy to just clip a few stems and use them! Plus it adds a nice fragrance to your home.
DeleteYour herb planters are adorable! Love the labels! And I also love the industrial edge they have leaving the cans non-painted!
ReplyDeleteThank you so much!
Delete