Patchwork Fabric Flag DIY Tees and Decor
Learn how to add a patchwork fabric flag design to t-shirts and kitchen decor in this step by step tutorial with video. If you can sew a straight seam, this project is easy!
This post may contain Amazon or other affiliate links. As an Amazon affiliate I earn from qualifying purchases. My full disclosure policy can be found here.
Hey friend, let's make the cutest patchwork flag tees that you'll love wearing all summer long to show your patriotic spirit! I also added my design to some dollar store potholders, and they would make such great gifts.
How to make patchwork fabric flag tees and potholders
I love a cute seasonal t-shirt, and this fabric flag tee is so darn cute! It's got patriotic charm in spades and was easy to make. I took my ideas and made a few patriotic potholders to add to my kitchen. You'll find both tutorials below. Read on to see how to make these patchwork flag projects!
I'm going to break this tutorial into two parts - the potholders and the tees. Please note that the design and the how-to is the same for both, but the sizes will vary. We'll start with the potholders.
Just a note: My patchwork flag designs are sewn on a machine, and this project is easy enough for even someone with beginning sewing skills, but it isn't necessary if you don't own a sewing machine. This fabric glue would work for a no-sew version, or you could use this iron-on tape.
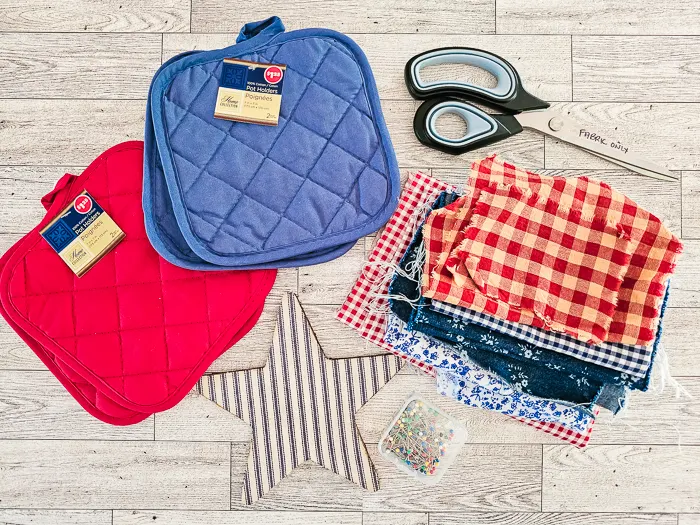
Supplies you'll need to make patchwork flag pot holders
- potholders (mine are from Dollar Tree)
- scrap fabrics in red and blue (I used red gingham, a dark blue floral (see similar) and a this blue and white floral)
- straight pins
- fabric scissors (these are my favorite and they're only $7!)
- sewing machine - or fabric adhesives
- optional - star shape to trace
Directions to make patchwork fabric flag
Start by washing and drying your fabric choices. I didn't wash the pot holders.
Tear fabric
I like to tear, rather than cut, my fabric for two reasons:
- It's fast and easy
- It gives me even shapes with frayed edges
Make a small snip with scissors and tear fabrics into the shapes and sizes you want. For reference, here are the sizes I made my patchwork design for the pot holders:
- 5"x4" background rectangle
- 2-3/4"x2" small rectangle
- three fabric strips that are 3/4" wide
Pin the smaller pieces to the larger rectangle to create your flag shape and look.
Sew fabric pieces together
Sew each piece around all edges. This creates the patchwork look. Your frayed edges will add texture and give your finished project a tattered look and feel.
Sew patchwork flag to potholder
Center and pin the fabric flag to the potholder and sew around the entire flag, essentially sewing a big rectangle.Now let's take a closer look at the fabric flag t-shirts.
Supplies to make patchwork fabric flag tees
- plain t-shirts (I used men's white cotton tees)
- fabrics in red and blue
- fabric scissors
- straight pins
- sewing machine or fabric adhesive
Important tip: Before you make your flag tees, be sure to wash and dry all fabrics you're using as well as the tee. You want any shrinkage to happen Before you sew your design together!
Directions to make a patchwork flag t-shirt
Please refer to this short video reel to see how I made the patchwork flag t-shirt. The steps were exactly the same as the ones for the DIY pot holders above, just on a larger scale.
Here are the measurements that I used for the patchwork flags I used on my tees:
- large rectangle measuring 7-1/2"x6"
- small rectangle measuring 3-3/4"x2-1/2"
- 4 fabric strips measuring 7"x1"
I sewed the fabric pieces together first, as in the previous tutorial, before pinning and sewing the entire patchwork flag to the t-shirt.
I am thrilled with the results of these cute patriotic patchwork flag tees and can't wait to wear them! If you want to add a star to your design, keep scrolling to see how I made mine.
How to add a star design to your patchwork flag
You'll need to trace a star shape on your fabrics. The only star shape I had was a 4" wood star from Dollar Tree that I covered in double sided patriotic fabrics last year. You can see that tutorial HERE.
Math and I don't get along, so here is my "eyeball it" way to reduce the size of this star to make a workable template that I could use.
- trace star shape onto printer paper
- use pencil to reduce the size as shown in the diagram below (sorry all you math nerds 😄)
- cut out star, pin to fabric and cut fabric star
I wasn't too worried about my fabric stars being perfectly even with equal sides. I'm more about charming imperfection!
I pinned and sewed the stars with a very narrow seam allowance and being sure to backstitch to keep stitches from coming apart.
On the t-shirt, I sewed my patchwork flag piece to the t-shirt first, then pinned and sewed the star over the top.
On the quilted potholders, I pinned and sewed one star at a time, overlapping the second star slightly. I was pleasantly surprised to see the fabric stars take on a quilted look once they were sewn.
I hope you love these patchwork fabric flag projects and give this a try!


-min.jpg)


This is fabulous, Cindy! Great ideas and wonderful outcomes!
ReplyDeleteThank you Sandra, much appreciated! Happy 4th!
DeleteThese are so cute and seems easy, we'll see! Have a great 4th of July!
ReplyDeleteThanks Marlene, happy 4th!
Delete