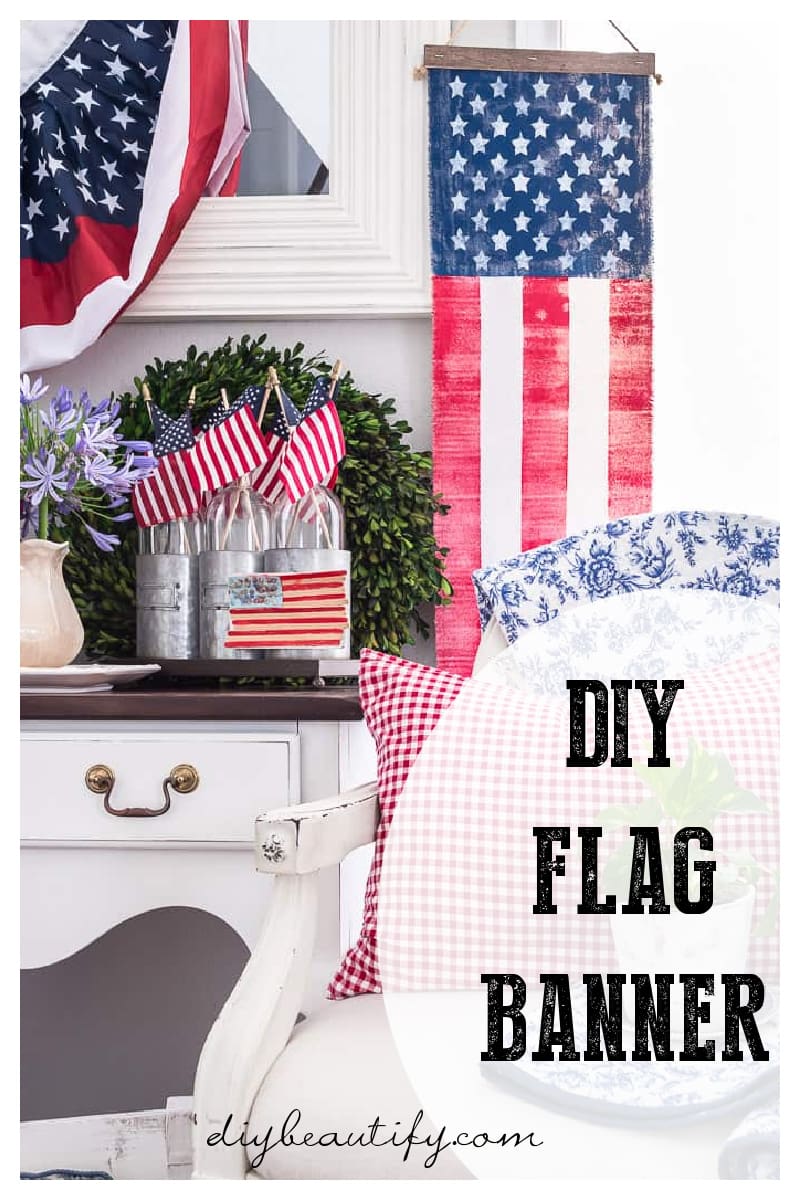
Easy Indoor/Outdoor USA Flag Banner
A step by step tutorial for a patriotic flag banner made using canvas drop cloth. It's budget-friendly, you can make it in an afternoon, and is as cute indoors as outdoors!

Updated June, 2023
Affiliate links may be included for your convenience;
my full disclosure policy can be found here. If you click through and make a purchase I'll receive a small
commission at no extra cost to you!
I wasn't born a US citizen, in fact, I've only had my citizenship since 2016!
You can find out more about me
here.
I love the country of my birth, but I love America too! Decorating with the
USA flag always makes me smile. It's a proud country, a strong land and I
appreciate the freedoms I enjoy.
I was inspired by
this banner
I saw on
Antique Farmhouse (one of my favorite sources for beautiful home decor with a vintage
farmhouse vibe). I knew a DIY version would look great on my front porch, so I set out to
make my own version using canvas drop cloth! I wanted my flag to have a
vintage look, rather than a mass-produced perfect look. I'm including the
supplies list as well as a step-by-step tutorial for you to make your own
patriotic flag banner!
Supplies for Flag Banner
- canvas drop cloth, washed and dried
- fabric glue (or sewing machine)
- red, blue and white acrylic paint
- foam roller set (high density rather than a fluffy one)
- paper plates and paper towel (not pictured)
- painters tape
- Silhouette or Cricut diecut machine to create stars (or purchased stencil)
- two paint stir sticks (small)
- stain color of choice (I used this one)
- small piece of natural jute twine for hanging
- waterproofing spray (I used this one because I had a can already, but this one would offer more protection outdoors)
- heavy duty staple gun

How to Make a Flag Banner
I love using fabric drop cloth because it's inexpensive, has a great nubby
texture and neutral color! I keep several on hand. For this project, I
actually used a drop cloth that I've used as a drop cloth! In other words, it had a few drips of paint on it, but that
didn't put me off at all! It just adds to the vintage feel 😃
Here are some other drop cloth DIYs you might like:
Here's how to make the drop cloth flag banner.
Rip Drop Cloth to Size
The first step to creating the flag banner
(after you wash and dry it) is to rip your drop cloth to the size you
want. Yes, I said RIP! It's much easier to get a straight line that way, plus
it leaves a nice, frayed edge. My drop cloth ended up being 11-3/4" wide
(including fringe) by 68" long.
Secure Long Edges
Next, fold your drop cloth in half, making sure edges line up. Sew (or glue)
the sides and bottom with a wide stitch. Doubling the drop cloth helps to add
to the weight of it which allows it to hang nicely.

Before we start painting, we need to mark off the top section for the stars.
To do this, fold one corner of the drop cloth down until the edge lines up.
Mark this spot. This creates a perfect square. If you prefer a rectangle, then
by all means do that!

Math Challenge
Before we get to the fun part, aka painting, we need to do a little math.😟😟😟 I am the first to admit that math is NOT my strength! In fact, I had quite a time figuring out how to make 5 even stripes! I even asked Google but then I had to figure out where 2.33" was on my measuring tape. 😕 Okay, stop laughing...I can hear you!! (and I KNOW that Mr DIY is rolling his eyes!) In the end, I mostly eyeballed it 😉 You can see that I have a piece of tape dividing the stripes section from the stars section. Press down firmly on the edges of your tape all the way down every side so you don't get any seepage!
Prep your Paint
For this step, you'll need two paper plates. Pour a little red paint onto one
plate. Fold several paper towels and lay them on the other plate.
Roll your foam roller in the paint to saturate it, and then roll the paint off
onto the paper towel a couple times.
Designer Tip: Any time you use a stencil (whether purchased or homemade, like the taped stripes) you will get the best results by removing most of the paint before taking your brush or roller to your project! You can always add more paint if you want, but you can't remove it!

Paint the Stripes
Run the roller down each stripe, being careful to paint over the fringe too.
In hindsight, I probably should not have used a piece of cardboard to protect
my desk because I ended up with cardboard lines on my flag. When I
stenciled drop cloth curtains
a few years ago, I used another drop cloth to protect my table. But for this
project, I was wanting a vintage, washed-out look, so I wasn't bothered by the
lines.

Once you've painted each of the red stripes, immediately remove the tape. Love
those nice, crisp lines!

Create the Stars Stencil
I have told you guys how much I love my Silhouette machine! I use it for home
decor projects all the time and it saves so much time and money! I purchased
mine as a bundle with a
ton of vinyl and tools and I highly recommend going that route if you are
looking to purchase one. You will also receive several tutorials and courses
to help you get started.
I created a design of 50 stars by measuring my drop cloth square
(that I marked off above), and then applying that size to my Silhouette
project. I picked a star design, shrunk it to the size I thought I'd need, and
then simply duplicated it. Once I had a row that was spaced evenly, I
duplicated that to create additional rows. You'll see I have 6 rows of 5 stars
and 5 rows of 4 stars...which equals 50 stars! I cut the stars onto a piece of
cardstock, which is a fantastic way to save your vinyl when you're making a
one-time-use stencil! I used the
weeding tool to pull the
stars off to create my own stencil (keeping the cardstock on my mat until I
was done removing all the stars).

Did you know I have a YouTube channel? Click to watch this short video to see how easy weeding is. If only weeding the flower beds were this fast and simple!
Paint Star Area Blue
Self explanatory! I know it looks blotchy, but you won't notice that once the
stars are added!

Paint Stars onto Drop Cloth
Let the blue paint dry and then tape the star stencil in place and paint stars
white, remembering to remove a little paint from your brush first!


Designer Tip: when using a handmade cardstock stencil, remember to hold
each section with your fingers while stenciling because there is no
adhesive on the backside. Alternatively, you could use a spray adhesive to
hold the stencil in place or even just tape the edges!

Stain the Stir Sticks
While you're waiting for paint to dry, at any step in the process, go ahead
and give your stir sticks one light coat of stain. Wait a couple minutes, wipe
the stain off and set those aside to dry.
Add the Hanger
Make sure your stir sticks are dry before you start this step...you don't want
to get wet stain on all your hard work! Measure the jute twine to the length
you want and cut. Make a knot in each end. Lay one stir stick (stain side out)
underneath your banner, lay the jute on top and secure in place with a heavy
duty stapler. Then set the second stir stick on top and staple again to hold
everything together!

Before hanging the DIY flag banner up outside, be sure to spray it with a
couple coats of waterproof sealant to protect it from water and damp.
I love this little $0 project, and how the DIY flag banner looks on my front
porch!
.jpg "An easy indoor/outdoor flag banner made using drop cloth! Perfect for all the patriotic holidays coming up! Get the free tutorial only at www.diybeautify.com! #DIY #patriotic")
But it's equally as cute indoors! I definitely need to make another one so I
don't have to keep moving it! It looks so good with the vintage vibes in my
home office!
.jpg "An easy indoor/outdoor flag banner made using drop cloth! Perfect for all the patriotic holidays coming up! Get the free tutorial only at www.diybeautify.com! #DIY #patriotic")
I also added it to a Patriotic Vignette I created in our entryway and it works seamlessly with the store-bought flags. In fact, the distressed nature of it adds a nice rustic touch!


I hoped you enjoyed seeing how easy it is to make a flag banner from drop
cloth! If so, please share it with a friend or two who enjoys crafts and
DIY!
Would you like more patriotic crafts and home decor ideas? CLICK HERE to see my complete selection.
More Patriotic Ideas
PIN to Save
bringing beauty to the ordinary,


What a creative idea- and you are super ready for the American holiday trio of memorial, 4th and labor- well done!
ReplyDeleteThanks so much Christine!
DeleteCindy this is an awesome idea and looks like the original one you saw. I might try this if I can find the stars cut out or a great stencil. Thank you.
ReplyDeleteThanks Di!! There are similar star stencils on Amazon... click the link in my supplies list to see them all!
DeleteLove this project.
ReplyDeleteThanks Bev!
DeleteCindy, your directions are clear and simple. This flag is something I really want to make. Thanks!
ReplyDeleteI'm so glad you found it easy to follow Laura! Thanks for letting me know!
DeleteGreat idea! I LOVE patriotic crafts. Your flag is just adorable. I love the rustic style. And you are right, it looks great both inside and outdoors! Thanks for sharing the tutorial. I can't wait to make my own!
ReplyDeleteThank you so much!
Deleteout of a dropcloth!!! ABSOLUTELY brilliant. love it!
ReplyDeleteThank you!
DeleteCindy I was looking for something to hand outdoors and I think this would be a perfect fit. Thanks for the inspiration!
ReplyDeleteYay, happy to inspire Mary!
Delete